Tips for Creating an Online Store

Posts Tagged ‘pictures’

Customer Pictures

Monday, November 24th, 2008

Last week I met Ted.  He started Powered Green.  You can buy a sticker for your laptop that goes towards buying a new wind turbine.  The wind turbine produces the amount of energy an average laptop needs in its life time.  Here is how it works.

Anyway… I bought one.  A day later Ted emails me asking if I can send him a picture of me and my powered by green laptop to post on their website.  Of course I was pumped and excited!  I sent him my picture and he posted it.

Rishi is Powered by Green!

I thought this was a great idea!  Post pictures of your customers using your product! This can be easily done with flickr or slide – Let me know if you are interested on a “How To” post about this.

Why I like it:

- The best customer testimonial you can get is a picture of your customer smiling and using your product

- It shows a sense of community

- This will get your customers involved and excited to be a part of your business.  Customers will be exited to show it off to their friends.

Free Web Based Photoshop

Monday, November 3rd, 2008

Checkout Pixlr.  If you want to simply retouch your images but don’t want to buy Photoshop.  In minutes you can upload your picture and modify.

Here are somethings I would use it for:

- Adding text to images (like your website name)

- Reducing the image size

- Cropping out the background

a clever way to supersize your images

Thursday, October 9th, 2008

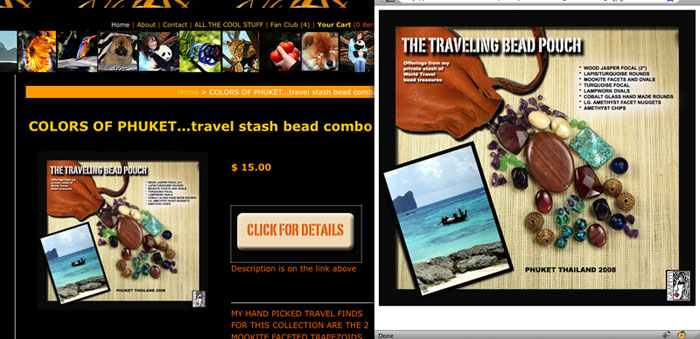
Have you ever wished you could have supersize product images on your store? Well, you may have noticed that we don’t offer this option yet… But never fear because our customers are always coming up with creative solutions to get the job done. Sandra at Graffiti Jewelry figured out a very clever way to have supersize images on her site: upload supesrsize images to Flickr and put a link with a popup window opener in the product descriptions. See it in action here.

Here’s how to do it:

  1. Upload your supersize images to your Flickr account (or your own web hosting account)

  2. Make note of the static URLs of each image. For Flickr, they will be something like this:

    http://farm4.static.flickr.com/1234/123432432.jpg

  3. Made a nice button that customers can click on to see the supersize image. Sandra’s button says “Click for Details” and matches her store. If you don’t want to do this, you can use a simple text link.

  4. Log in to your store headquarters, navigate to your product page, and put a link to the supersize image in the product description.

    Here is some sample HTML code that you can cut and paste. You will need to change the image link to the URL of your image from step 2. This is also where you would add code to link your image from step 3.

    <br><br><a href="#" onClick="MyWindow1=window.open('http://farm4.static.flickr.com/1234/123432432.jpg','MyWindow1','toolbar=no,location=no,directories=no,status=no,menubar=no,scrollbars=no,resizable=no,width=900,height=850'); return true;">Click for details</a>

Thanks Sandra!

Thumbnail Images Revamped!

Tuesday, June 17th, 2008

We just changed the way the product thumbnail images are displayed. They are now intelligently cropped into squares which makes them line up nicely on your page.  In many cases they also look sharper because they are not stretched.  Enjoy!

Multiple Images

Monday, May 19th, 2008

Now you can add multiple pictures for each product. Show all the angles, zoomed in photos, different colors and styles.

Here is How it Works:

1. Login to your headquarters and upload your images on the product page.

2. Set a primary image. This is the image that will be displayed as a thumbnail on your homepage, department, and brand page. *Optional

3. Link up your images to specific variations. For example if you have a t-shirt available in green and blue match the green variation to the green t-shirt picture. This way the image on the customer receipt and cart will match up. *Optional

I’m really excited to see how all of you use this feature.

Edit your photos online with Picnik – fast, easy, and free.

Monday, March 17th, 2008

This weekend a store owner asked me if I knew of any good tools to make her product pictures look better. I did a little research and found Picnik!

Picnik is a really sweet tool for photo editing. It lets you do all the normal stuff like resize, crop, rotate, etc. But their other features like auto fixing which adjusts the color levels in the photo… I was blown away by this feature alone! You can also add frames, colors, shapes, and text. It pretty much does anything I would ever want for my photos. Let me know what you think of it.

Tabletop Photo Studio

Tuesday, January 29th, 2008

I was on the plane this weekend and I got bored with my book so I checked out the Sky Mall magazine. A lot of ok products until I came across this: tabletop photo studio! This could be great way to improve your picture quality. It retails for about $80 but I am sure you can make your own homegrown studio from looking at this picture from things around the house.

7 Tips on taking Product Pictures so you can sell more

Thursday, January 10th, 2008

Want to increase sales?  Take better pictures! Never underestimate the power of your photos.

When you are building your online store put some time and effort into making your products shine.

7 tips on taking better product pictures

1. Use a digital camera.  (Just in case you don’t) Using a digital camera will allow you to instantly preview, upload and edit.

2. Use a tripod or some sort of stand.  Stack some books, if you don’t have a stand. You will avoid blurry images by having the camera in a fixed position.

3. DON’T USE FLASH. Using flash will wipe out the color and details. Worst of all it will create shadows.

4. Use an easy-on-the-eyes backdrop. Use a cloth or a solid color background. Your product should be the only item in the entire picture. Avoid clutter at all costs.

5. Get close, get personal. Buyers like to see the details of the product, so take pictures that can show every possible detail of the product.

6. Take multiple pictures at different angles. It is all about trial and error. After taking 5-10 pictures of your product, check it out on your computer to see which one looks the best.

7. Edit your pictures. Crop out unneeded space and/or items in the picture. Save them as JPEG files.

I guarantee that after following these 7 tips your customers will have a better shopping experience.

I love pictures

Sunday, May 13th, 2007

Let your pictures do the selling!

Flying Cart supports 3 Types of File Formats for your sweet product pictures
(1) .JPG/.JPEG: Supports 16 million file formats. More Info
(2) .PNG: Portable Network Graphics format is a completely loss-less compression. More Info
(3) .GIF: The format uses a palette of up to 256 distinct colors from the 24-bit RGB color space. More Info