Settings > Store
Flying Cart’s Fan Club feature is a social network for your store, creating a direct link between you and your most valued customers.

When a fan joins your fan club you can send them newsletters, updates on your latest products and coupons. This is the best way to stay in touch with loyal customers. We suggest contacting them on a monthly basis to keep them posted about your newest products, events, or deals.

Start by inviting your friends, family, and colleagues using our email address book import tool (under “Fan Club > Invite Fans”) to let your contacts know about your new store. Any new customers that make purchases from your store automatically become fans.
The Facebook Connect tool (beneath the email subscription box) allows new visitors to becomes fans in one click using their Facebook account. And if you’re eager for more fans, be sure to sell the upside of the Fan Club (i.e. sales, coupons, and new product alerts) when promoting your store on the social web. Some customers choose to take out the “Facebook Connect” button, which is ok by us since customers can also join your Fan Club by simply entering their email.
Fan Message Subject Line:
Your Store Name Here invited you to join it’s fan club
Fan Message Body:
Hi there!
I’m the owner of Your Store Name Here and would like to invite you to join my store fan club. You will receive updates about sales and new products, see who else is shopping at my store, and other fun stuff along the way. You will also be able to write reviews, create a personal shopper profile, and you will have special access to all stores in the Flying Cart network.
So check it out and have fun!
Your Contact Info Here
Your Name, Your Store Name Here
No, the message currently cannot be customized if sent through the Flying Cart HQ. You can use your own email provider (like Gmail, Yahoo Mail, or AOL Mail) and send a personalized message with the link to join your Fan Club instead of adding the addresses through the Flying Cart Fan Club admin section.
Yes, you can mail using your own client with the .CSV export tool (under “Fan Club > Fans”). You can export all your fans with one click.
A .CSV file allows you to export your fan names and email addresses in an Excel spreadsheet. We provide this in case you want to send a mass email using your own email program (Gmail, AOL, etc).
Link sharing is a way for visitors to easily share your products on the web. Users can share a link to your items on Facebook, Twitter, StumbleUpon, and more by clicking the share icons underneath your products. This allows your products to get viral exposure.
The Facebook Connect tool allows users one-click subscription to your fan club and email list using their Facebook account. Just two more ways Flying Cart helps to get more customers!
Visit Store > Settings and scroll down to “Store Preferences” until you see the Link Sharing option. Check the box to activate “Use link sharing on my product pages”. On default Link Sharing is turned on in your store.
We suggest getting the ball rolling by social bookmarking your own products with your own social networking accounts!
Google Analytics is a powerful tool for viewing in depth stats. You can see what keywords people typed into Google to find your store, what pages they clicked on, how many visitors you have, other sites/blogs referring traffic to your store … and much much more!
We can’t explain it better than the makers themselves, so check out the Google Analytics Getting Started Guide.
Settings > Account
In the HQ, go to Store > Settings and scroll down to Password under the Basic section. Enter your new password twice and save the settings.
Settings > Payment
In the HQ, go to Settings > Payment and select your currency from the dropdown box marked Currency at the top of the page.
You can charge customers by credit card or PayPal by integrating your store with your PayPal Business Account.
If you don’t have a PayPal Business Account, follow these steps to get one:
1. Go to PayPal.com.
2. Click “Sign Up” at the top of the page.
3. Click on “Get Started” under Business Account. (If you already have a PayPal account, click “Upgrade” on the right side of the page)
4. Select “Website Payments Standard” from the drop down menu.
5. Follow the three PayPal steps listed on the PayPal website.
Once you’ve created your PayPal account, you can link it to your Flying Cart store by logging into your Flying Cart headquarters, then go to Settings > Payment, then scroll down to the PayPal Standard section and add your PayPal account address.
Click on the “Update Settings” button located at the bottom of the page to save your changes
Your customers will now be able to purchase your products with a credit card or PayPal account!
NOTE: You will need to verify your bank account and email information with PayPal in order to successfully place an order in your store. It takes 3-5 business days after signing up for a PayPal business account to start accepting payments via PayPal standard (with a credit card). If your cart still doesn’t work after 3 days call PayPal Tech Services directly at 1-800-852-1973 to see whats going on with your account.
Flying Cart supports all currencies that PayPal and Google Checkout support.
See PayPal’s full list here.
First, please note, we recommend using the Flying Cart tax settings, which allows more checkout options including Google Checkout. If you want use PayPal to charge tax to customers in your state only OR if you want to charge different tax rates depending on the customer location, here are step-by-step instructions for PayPal tax settings:
1. Login to your store headquarters
2. Navigate to “Settings” > “Store”

3. Scroll down the page to the “PayPal Standard” section and select “Use my PayPal tax settings”

4. Hit “Update Settings” at the bottom of the page to save your changes
5. Login to your PayPal account
6. Click on “Profile”

7. Click on “Sales Tax”

8. Click on “Add New Sales Tax”

9. Follow the PayPal instructions, repeat to setup more than one location
–
Please Note: If you are using Google Checkout and/or PayPal Express, your PayPal Tax settings will not be applied when a customer makes a purchase via PayPal Express. We highly recommend deleting all Google Checkout and PayPal Express information on your store settings page if you want to use PayPal tax settings. Your customers will still be able to pay with PayPal or any major credit card.
Yes, we recommend PayPal or Google Checkout as a payment method. Google Checkout hasn’t been around long (started in 2006), so PayPal is still the leading and most trusted checkout solution on the web. At Flying Cart, we see higher conversions with PayPal because it is generally considered trustworthy.
Yes, please see the chart below for transaction fees. The transaction fee will be automatically deducted when the purchase is made, so remember to consider this fee when setting your prices.

Visit PayPal for more information on fees.
Please note that Flying Cart does not take a cut of your sales at anytime and all funds go directly to your account. We only charge a flat monthly fee.
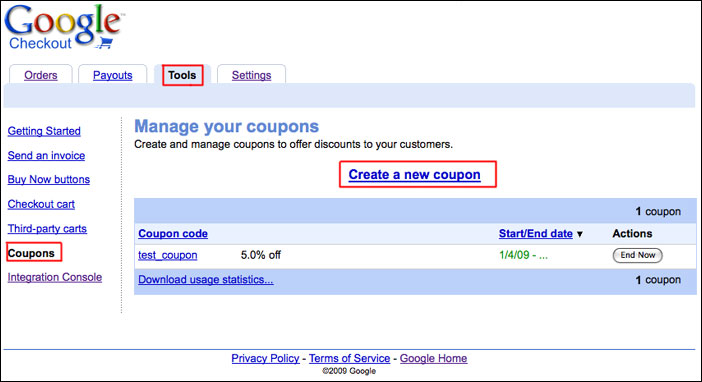
Google Checkout allows you to accept credit card payments using a (free) Google account. In our experience, it is easier to use and more reliable than PayPal for a nearly identical functionality. Read more about Google Checkout here.
Follow these steps to use Google Checkout on your store. Feel free to download and print these instructions out.
1. Sign up for a Google Merchant account. It is free and easy.
Please Note: Google will make a small deposit in your bank account and you will need to verify the amount in order to complete your sign up. This will take a day or two.
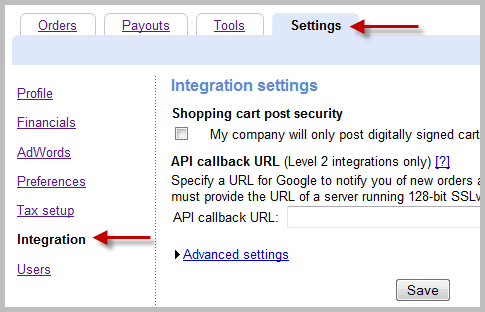
2. Login to your Google Checkout account and go to “My Sales”.

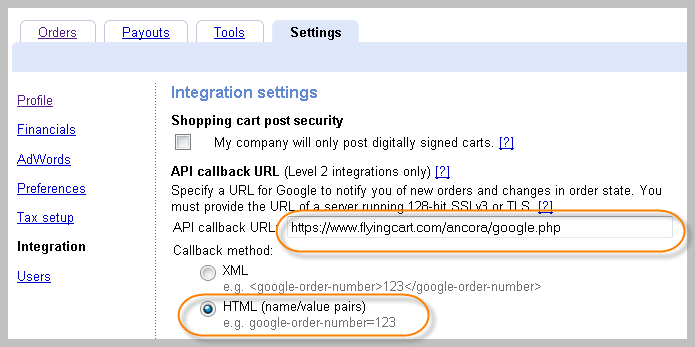
Click on the “Settings” tab and then click on “Integration” on the left.

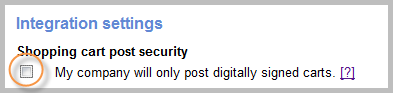
3. Make sure “My company will only post digitally signed carts.” is unchecked.

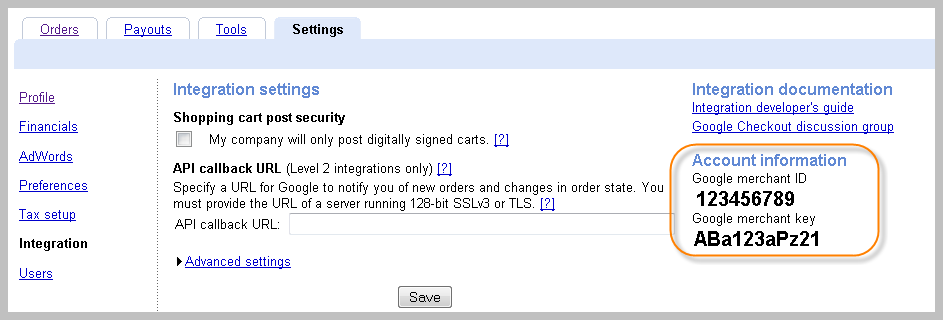
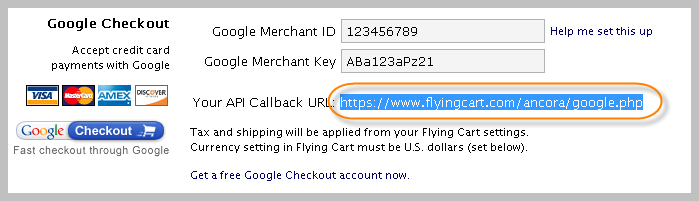
4. Locate your Google merchant ID and Google Merchant Key on the right side of this page.

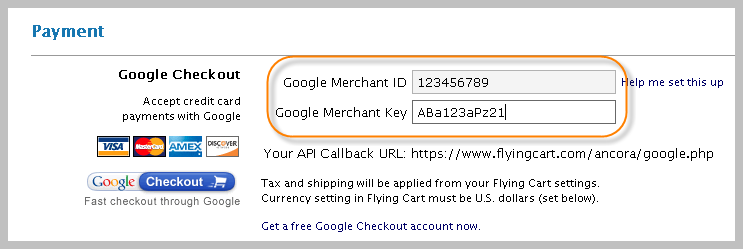
5. Login to your Flying Cart store headquarters (in a new browser window). Go to your “Settings” -> “Payment” tab. Scroll down and enter in your Google Merchant ID and Google Merchant key that you got from Step #4.

6. Double check that your Google Merchant ID & Key that you copy/pasted into your Flying Cart settings section is exactly what Google Checkout gave you.
7. Highlight your API Callback URL from the Google Checkout section and go to Edit > Copy in your browser to copy it. Scroll down the page and click “Update Settings” at the bottom.

8. Go back to the window with your Google Settings and paste the API Callback URL into the field on that page. Select “HTML (name/value pairs)” as the callback method. Hit “Save”.

9. Go to your store, put something in your cart and notice that Google Checkout is now an option. Enjoy!

Yes, please see the chart below for transaction fees. The transaction fee will be automatically deducted when the purchase is made, so remember to consider this fee when setting your prices.

Visit Google Checkout for more information on costs and fees.
Please note that Flying Cart does not take a cut of your sales at anytime and all funds go directly to your account. We only charge a flat monthly fee.
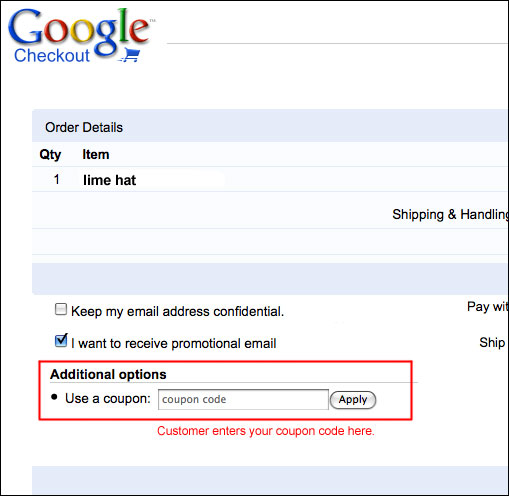
Yes, customers can checkout with just a credit card and no PayPal account. Click here for more information on checking out without a PayPal account.
In the United States you do not need to charge a sales tax to customers out of your state.
Here are some examples:
Running your business from your home:
Q: If you live in any U.S. state and have a home based business (no warehouse or outside office space), do you need to charge sales tax?
A: No. You don’t have to charge any sales taxes.
Running your business from an office/warehouse:
Q: If you live in any U.S. state and sell products out of a small warehouse, do you need to charge sales tax?
A: You only need to charge a sales tax to Florida residents, out of state online orders don’t require sales tax.
Running your business from multiple locations:
Q: If you have offices/warehouses in multiple states, for instance California, Illinois, and Nebraska, do you need to charge a sales tax?
A: You need to charge a sales tax to California, Illinois, and Nebraska residents only.
More Information:
Internet sales are actually regulated by the federal government because it reaches across state borders. Under current law, states cannot reach beyond their borders and compel out-of-state vendors to collect the tax owed by that state’s residents. What happens is those who buy online are supposed to report it and pay “use tax” in their state, even though it’s not heavily regulated.
Disclaimer: Please check with your state and local tax bureaus. Local laws change all the time and these are simply my suggestions based on past experiences. I am not a Tax expert.
Settings > Shipping
You can set the shipping rules through Flying Cart. Your customers can be charged shipping fees by the price or weight ranges you determine in your Flying Cart HQ (Navigate to Settings > Shipping).

Alternatively, if you’re using a PayPal account, you can use PayPal’s shipping rules to charge your customers. PayPal offers more advanced shipping settings. Checkout our instructions here to setup shipping via PayPal. Note that if you use PayPal’s shipping rules, you cannot use Google Checkout. Whichever route you use, the general rule with shipping is keep it simple, and you’ll save yourself many headaches.
If you’re shipping by weight, you must add weight to all of your products. To do so follow these steps
1. Save your shipping preferences to “By weight” under Settings > Shipping.

2. Then, for ALL of your products, go to the corresponding product details/edit page, and under the variations section you can add the product’s weight in pounds (So you’ll need to convert ounces to pounds, for example, 8 oz = .5 lbs). Once you’ve added the weight information to all of your products, the next step is setting your shipping amounts.

3. To set shipping ranges, go to Settings > Shipping. “By weight” should already be selected, then below you’ll see “Add New Location” set to the default option “Everywhere”. We suggest starting with everywhere, and adding other specific locations as needed.
4.To set your price range by weight: Click the blue “Add” button next to whatever location you selected. Decide on your ranges, then enter them into the From (lbs.) and To (lbs.) fields. Be sure weights do not overlap. For example, if you’re charging $5 in shipping for the range of 0 – 2 lbs, then the next range would start with 2.01 lbs. Click the blue “Add” button next to the weight range to add more ranges.
1. In the HQ, go to Settings > Shipping
2. Set your preference to “By Price” then click the “Save” symbol next to it.
3. Select your location. The location is set to “Everywhere” by default, and we recommend using this setting to start out. Then you can add more locations later, as your orders require.
4. Once you’ve selected a location, click the blue “Add” button. You can now set your rates in the text boxes with From (USD) and To (USD).
5. Enter your price ranges, making sure the prices do not overlap. For example, if you charge $5 for your first range of $0 – $40, then the next range would start at $40.01. Click the blue plus symbol next to the price range to add more rang
Shipping by Price Example:
Here is an example of a shipping page that charges $5 for orders everywhere between $0 – $15, $7.50 for orders between $15.01 – $50.00 and free shipping for orders above $50.00. Shipping to Australia costs $10.00 more so I adjusted my shipping rules to account for that..
To offer free shipping, simply leave all the shipping information blank.
Offering free shipping can be done through the shipping ranges section in your Shipping Preferences. If you’re shipping by price, enter the price range you want to offer free shipping for and leave the cost at zero. So, in our example below, shipping is free on all products that cost between $85.01 – $200.

Offering free shipping can be done through the shipping ranges section in your Shipping Preferences. If you’re shipping by weight, enter the weight range you want to offer free shipping for and leave the cost at zero. So, in our example below, shipping is free on all products between 20.01-40 lbs.

You can use USPS with your PayPal account.
1. Login to your PayPal account
2. Navigate to My Account -> Profile -> More Options

3. Under “Selling Preferences” click on “Shipping Preferences”

4. Make USPS Postal Services your Default Shipping Center and click the Save button

5. Next you need to setup shipping rules (similar to ours).
6. Navigate to My Account -> Profile -> More Options
7. Under “Selling Preferences” click on “Setup Shipping Calculations”
8. Setup your rates based on weight or price.
9. Go into your Flying Cart headquarters and make sure you set PayPal shipping override on.
If you choose to use USPS with Flying Cart you will not be able to use Google Checkout.
For simplicity sake we strongly recommend using our shipping settings and make it a flat fee nationwide. It will simplify your life dramatically. Once business picks up it is worth tweaking your shipping settings.
If you need advanced shipping options, using your PayPal shipping settings is the way to go. Here are step by step instructions on using your PayPal Shipping Settings. Please note: PayPal shipping settings will override any Flying Cart shipping settings.
1. Login to your store.
2. Navigate to “Store” -> “Settings”
3. Scroll down the page to the “PayPal Checkout” section and select “Use my PayPal shipping settings”

4. Click “Update Settings” at the bottom of the page.
5. Login to your PayPal account
6. Click on “Profile”

7. Click “Setup Shipping Calculations”

8. Follow the PayPal setup instructions to setup your shipping settings
–
Please Note: If you are using PayPal shipping settings, and you are also using Google Checkout and/or PayPal Express, then your PayPal Shipping settings will not be applied when a customer makes a purchase via Google Checkout or PayPal Express. We highly recommend deleting all Google Checkout and PayPal Express information on your store settings page if you wish to use PayPal shipping settings. Your customers will still be able to pay with PayPal or any major credit card.
Settings > Custom Domain
Don’t have a domain yet? First register your desired domain name with a domain retailer like GoDaddy (recommended), myDomain, Register.com, etc.
1. You must register your domain name. You can buy a domain name if you don’t already have one. Skip this step if you already own a domain name.
2. Click on the companies below to find specific instructions corresponding to your domain:
GoDaddy instructions (we prefer GoDaddy)
myDomain instructions
Register.com instructions
Network Solution instructions
1 and 1 instructions
If you don’t see your company listed here, then follow our generic instructions below, or contact us.
Generic Domain Setup Instructions:
1. Get to your DNS settings in your domain provider.
2. Look for the www alias. It is probably currently pointed to @. This is the CNAME you will be editing.
3. Enter “www” for the Alias Name, and “stores.flyingcart.com” for the “Points to Host Name” and save.
4. Setup forwarding on your domain so http://www.YourStoreDomain.com goes to http://YourStoreDomain.com
4. Login to your Flying Cart store headquarters
5. Navigate to the Store -> Settings tab and locate the “Website Address” section on the page
6. Type in your domain name under “Use your own domain:”
Contact us if you have any problems. We will help you get your custom domain going! (We know how this can be tricky sometimes)
1. Login to your store
2. Click on Settings > Store
3. Type in your new Flying Cart subdomain and click the “Update” link right next to it.