Tips for Creating an Online Store

Archive for the ‘Help & Support’ Category

Charge Shipping by Weight

Tuesday, May 20th, 2008

Our most requested feature yet! Now you can charge shipping based on total weight of an order.

How it Works

Step 1: Login to your store Headquarters and navigate to Store -> Shipping

Step 2: Click on the drop down and select “Ship by Product Weight” and hit Save

Step 3: Specify shipping prices based on weight ranges

Step 4: All your products will now have an editable Weight field added to them on the edit pages

Step 5: Go to each product page and specify how much each item weighs

Your customers will be charged based on the total weight in the cart.

Multiple Images

Monday, May 19th, 2008

Now you can add multiple pictures for each product. Show all the angles, zoomed in photos, different colors and styles.

Here is How it Works:

1. Login to your headquarters and upload your images on the product page.

2. Set a primary image. This is the image that will be displayed as a thumbnail on your homepage, department, and brand page. *Optional

3. Link up your images to specific variations. For example if you have a t-shirt available in green and blue match the green variation to the green t-shirt picture. This way the image on the customer receipt and cart will match up. *Optional

I’m really excited to see how all of you use this feature.

What is PayPal Express Checkout?

Saturday, May 10th, 2008
PayPal Express Checkout is a service that allows your customers to pay using a PayPal account instead of a credit card. They can make purchases without entering billing, shipping, and credit card information since that information is already stored with PayPal.
Does it cost extra to use PayPal Express Checkout or do I need a special account?
PayPal Express Checkout can be used for free with any PayPal Business account, which you must have anyway in order to use eCommerce in your store.
How do I activate PayPal Express Checkout in my store?

1. Log in to your PayPal Business account.
2. Click the Profile subtab located in the top navigation area and then “More Options”
3. Click the API Access link under the Account Information header.
4. Click “View API Certificate” under Option 2
5. Copy your API Username, API Password, and Signature and enter it into your Store Headquarters.

What currencies does PayPal support?

Thursday, April 24th, 2008

As of 4/24/08 they support:

  • Canadian Dollars
  • Euros
  • Pounds Sterling
  • U.S. Dollars
  • Yen
  • Australian Dollars
  • New Zealand Dollars
  • Swiss Francs
  • Hong Kong Dollars
  • Singapore Dollars
  • Swedish Kronor
  • Danish Kroner
  • Polish Zloty
  • Norwegian Kroner
  • Hungarian Forint
  • Czech Koruna

More details located on this PayPal support page.

How To Cancel your Flying Cart store

Sunday, March 23rd, 2008

We hate to see you go but we understand that sometimes you just need to cancel.

1. Click on “My Account” located at the upper right hand corner

2. Scroll down and Click on “Please cancel my account.”

After canceling, your store will no longer be active and you will never be billed by us again.  Please contact us if you need us to re-activate your store.  We do charge a 1 time $60 re-activation fee for our time.

How do I get PayPal setup on my store?

Thursday, February 7th, 2008

You can charge customers by credit card or PayPal by integrating your store with your PayPal Business Account.

If you don’t have a PayPal Business Account, follow these steps to get one:

  1. Go to PayPal.com.
  2. Click “Sign Up” at the top of the page.
  3. Click on “Get Started” under Business Account. (If you already have a PayPal account, click “Upgrade” on the right side of the page.)
  4. Select “Website Payments Standard” from the drop down menu.
  5. Follow the three PayPal steps listed on the PayPal website.

Once you have your PayPal business account. Follow these steps:

  1. Login to your store
  2. Click on the “Store” tab
  3. Click on the “Settings” sub tab
  4. Enter in the email you use to login to your PayPal business account

  1. Click on the “Update Settings” button located at the bottom of the page to save your changes

Your customers will now be able to purchase your products with a credit card or PayPal account!

NOTE: You will need to verify your bank account and email information with PayPal in order to successfully place an order in your store. It takes 3-5 business days after signing up for a PayPal business account to start accepting payments via PayPal standard (with a credit card). If your cart still doesn’t work after 3 days call PayPal Tech Services directly at 1-800-852-1973 to see whats going on with your account.

CSS Reference Guide

Friday, December 28th, 2007

This is a detailed guide to all the CSS tags used by Flying Cart.

Div Tags: Layout
The DIV tags are used for page layout. They are on every page of the store unless otherwise noted. You can modify the default CSS to dramatically change your store layout.
div#container
A container surrounding the header content, the department menu, the main content, and the footer of the page.

div#header
Formatting for the header if the logo is being displayed as text.

div#header_with_logo
Formatting for the header if a logo image is used.

div#store_name_with_logo
Formatting for the store name if a logo image is used. (See class .header_text for a store name displayed in text.)

div#top_menu
Formatting for the top menu.

div#wrapper
A container surrounding the department menu.

div#menu
A container surrounding the department menu items.

div#content
A container surrounding the inner content of the page.

div#breadcrumb
Formatting for the breadcrumb navigation links. Located on all pages of the store except the homepage.

div#footer
A container surrounding the footer content.

The heirarchy of DIV tags looks like this:

HTML Tags: Formatting

The following standard HTML tags are used within the store and you may choose to style them.

body, a, table, tr, td, h1, h2, h3, p, form

Class Tags: Boxes, Navigation, Text
These classes are used in the inner content of the store pages.

.header_text
The store name if it is being displayed as text

.small_text
The smallest font option.

.medium_text
A medium size font option.

.menu_item_wrapper, .menu_item
The formatting and layout for department names.

.message, .error
The text and box for successful and error feedback to user actions.

.network_box
The region containing the list of the social network connections. Located on the homepage.

.connection
The region containing each social network connection

.product_box
The region containing each product thumbnail image, title, and price. Located on the homepage for Featured Items and on the Department pages

a .product_title
The link text for the title of a product when it is displayed inside a .product_box.

.product_price
The text for the price of a product when it is displayed inside a .product_box.

.product_title_detail
The text for the price of a product when it is displayed. Located on the product detail page.

.addtocart_box
The region showing the add to cart options. Located on the product detail page.

.addtocart_box_head
The top row of the add to cart options. Located on the product detail page.

.cart_box
The region containing the items in the shopping cart. Located on the Cart page.

.cart_box_head
The top row of the table containing the items in the shopping cart. Located on the Cart page.

.cart_box_item
A single row per item in the shopping cart. Located on the Cart page.

.btn
A standard button. Located on the product detail page, the Cart, the Email-A-Friend page.

.btn_sub
A secondary button. Should be smaller or less prominent than the .btn class. Located on the Cart page.

.btn_pay
The button users click to go to PayPal and pay by credit card. Should be larger or more prominent than the .btn class. Located on the Cart page.

The following screenshots show exactly where the classes are used. Class names are indicated in bold black text.

Screenshot 1

Product detail page

Screenshot 2

Cart page

Table ID Additions – Added June 2008

There are now “id” fields assigned to all of the tables on pages within the stores so you can further customize your layout. Here is a list of all the id names. View the page source code within your store to see what goes where. The names explain themselves.

saleContentTable, saleContentTableRow, saleContentTableCell

productsContentTable, productsContentTableRow, productsContentTableCell

homeContentTable, homeContentTableRow, homeContentTableCell

featuredItemTable, featuredItemTableRow, featuredItemTableCell

networkBoxTable, networkBoxTableRow, networkBoxTableCell

emailAFriendTable, emailAFriendTableRow, emailAFriendTableCell

detailContentTable,detailContentTableRow, detailContentTableCell

detailImageContentTable,detailImageContentTableRow, detailImageContentTableCell

cartContentTable, cartContentTableRow, cartContentTableCell

contactBoxTable, contactBoxTableRow, contactBoxTableCell

How do I use customized CSS?

Friday, December 28th, 2007

You can use our custom CSS feature to create a unique design for your store. This document explains how to install a custom CSS file and how to upload images to use with your CSS.

The Learning Curve
Developing with CSS has a significant learning curve. New users should do some reading and go through an online tutorial before attempting anything. Users with basic
CSS knowledge should experiment with modifying the default CSS provided in the Headquarters. Intermediate and advanced users should be comfortable using our CSS reference to create complex new designs and layouts.

If you are having trouble getting your CSS to look right, there are lots of online reference materials.

Updating a CSS File

  1. In your store Headquarters, go to the Store > Custom CSS tab.
  2. Check the box to “Use custom CSS as defined below”.
  3. The default CSS that appears in the editing window is the CSS used in our Standard template. You can begin editing from there, or you can paste in your own file.
  4. Click “Update CSS” to save your changes.
  5. View your store to see the new design in place. You may have to reload the page and/or press CTRL-F5 (in Windows) to see the changes.

Uploading Images to Use with your CSS

You may be interested in using background images, button images, or other types of images with your CSS file. We make it easy and let you host these images on our servers.

  1. In your store Headquarters, go to the Store > CSS Images tab.
  2. To upload an image, click on the Browse button and find the image that you would like to upload.
  3. Click Upload to upload the image.

All the images that you upload will be accessible in the directory http://yourstorename.flyingcart.com/mytemplates/images, with the original filename of the file that you uploaded. For relative links, you should use mytemplates/images/ as the relative path.

For example, if you have an image called myimage.jpg that you want to set as a background, you would use the following CSS in the body tag: background-image: url(“images/myimage.jpg”).

Tips

Make sure you check your site in different browsers. Some CSS tags look very different in different browsers, and some are not universally supported. Invalid CSS may cause your customers difficulty using the site. We recommend that you check your site in Internet Explorer 6 and 7, Firefox, Safari, and on a Mac and PC to make sure it looks like you expect.

Generic custom domain instructions

Saturday, December 22nd, 2007

You bought a domain name.  Congrats!  Must feel good.  Now it’s time to link it your Flying Cart store.  Follow the instructions below to get it going.

1. Get to your DNS settings in your domain provider.

2. Look for the www alias. It is probably currently pointed to @. This is the CNAME you will be editing.

3. Enter “www” for the Alias Name, and “stores.flyingcart.com” for the Points to Host Name and save.

4. Setup forwarding on your domain so http://www.YourStoreDomain.com to http://YourStoreDomain.com

4. Login to your Flying Cart store headquarters

5. Navigate to the Store -> Settings tab and locate the “Website Address” section on the page

6. Type in your domain name under “Use your own domain:”

Enter Website Address

7. Hit the “Update Settings” button towards the bottom.

8. Wait a full 24 hours

If these instructions don’t work for you.  We can help! Please contact us under the “Help” tab in your store headquarters.  Please include where you purchased your domain name.

MyDomain.com Custom Domain Instructions

Saturday, December 22nd, 2007

My Domain LogoYou have a domain name from MyDomain.com.  The next step is to link it to your Flying Cart store.  This way your customers can just type in your domain name and go right to your store.  Exciting!  Follow these instructions to get it setup.

1. Login to your MyDomain.com account.

2. Click on the “My Domains” tab at the top.

My Domains Tab

3. Click on your domain name

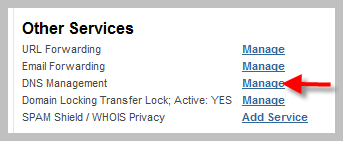
4. Scroll down and click on “Manage” next to “DNS Management”.

My Domain Other Services Section

5. Locate the “CNAME” section enter “www” and make the canonical name “stores.flyingcart.com”.  Click the “Update” button.

CNAME

6. Login to your Flying Cart store headquarters.

7. Navigate to the Store -> Settings tab and locate the “Website Address” section on the page.

8. Type in your domain name under “Use your own domain:”.

Enter Website Address

9. Hit the “Update Settings” button towards the bottom.

10. Wait a full 24 hours.