Tips for Creating an Online Store

Posts Tagged ‘coupons’

Video Tutorial: How to Add Coupon Codes to Your Online Store

Wednesday, June 29th, 2011

A customer just asked me how she can add Coupon Codes to her store. We do have some step by step instructions here but I decided to spice things up a little bit and make a video tutorial. Check it out here.

Marketing FAQ

Thursday, October 7th, 2010

Basic Marketing

Keywords are a way for your site to communicate with search engines, with the goal of helping to drive customers to your store. Fill out your site keywords in Marketing > Basic, and use terms that are most related to your topic. Try not to go crazy and spam up this field with a ton of keywords… choose a few really strong ones to focus on. But don’t worry too hard—this section isn’t actually as important as you may imagine.

Now, your website title is the most important element for considering keywords. After the title, shift your focus to the keywords section.

The best way to figure out which keywords to use is to ask yourself this question: “How do I want people using Google to find my store?” The more specific you can be the better. For example “Japanese Art Toys” is good but “Japanese Vinyl Art Toys by Immortal Beloved Toys” is even better.

If you simply want people to find your store by its name, than make that your website title. By default your website title is your store name. If you want people to find you by your top selling product, then make your website title the same as the title of your top selling product.

Advanced Marketing

This is the easiest way to make sure Google knows your store exists. Here’s a step-by-step guide to getting verified:

1. Go to Google Webmasters Tool website and login with a Google account.

2. Click on “Add Site”

3. Enter in your Flying Cart store URL (ex: www.MYCoolStore.FlyingCart.com) and click “Continue”

4. Select “Meta tag” for the Verification method

5. Copy the entire line of code they give you INCLUDING the brackets “<” and “>” and click on “Verify” towards the bottom.

6. Login to your store Headquarters

7. Click on the Marketing > Advanced tab

8. Scroll down to the “Google Verification Code” Section and paste in the entire line of code you obtained in step #5

9. Click “Update Settings” in your store headquarters

10. Click “Verify” in your Google Tools account

Google Product Search is a great (and free) way to get more exposure for your products. In fact, some merchants have reported an 800% increase in traffic when they submit their products to Google Product Search. Yes, that isn’t a typo… 800%!

You can watch our step by step video. Here is Part 1 and Part 2. (Video is also embedded below). Or you can follow our step by step written instructions below the video.

Part 1: Verify and Claim your store URL with Google

Part 2: Create you Datafeed and submit

By following these directions to create a product feed and a Google Base FTP account you will be able to submit your products to Google Product Search from within your Flying Cart Headquarters. We also submit your products automatically every 30 days so they never expire from Google.

Here’s how to do it:

1. Be sure you’ve completed the steps to verify your online store with Google in the Marketing > Advanced section.

2. Log in to your Flying Cart Headquarters and navigate to Marketing > Advanced Tools. Find your “Product Feed Filename” and write it down.

3. Go to Google Base and sign in with your Google account. Your Gmail email address will work. If you don’t have a Google account they will take you through the necessary steps for you to sign up for one. During the sign up process you will need to specify your location, agree to the Google Base Terms of Service, and enter in your account info (Business Name, Address, eMail, etc.)

IMPORTANT 4. List your website URL in Google Base settings. If you use a custom domain enter in your custom domain (not your .flyingcart.com domain).

5. Click on “Data feeds” and then the “New Data Feed” button.

6. Pick your Target Country, select your data feed type as “Googlebase”, and enter in your product feed file name (the one your wrote down in step 1).

7. Next you will need to create a Google FTP Account. Click on “Settings” and then “FTP”.

8. Create a FTP username and password. Write it down. Wait several hours for Google to activate your account. (Google says that it takes 15 minutes, but we have noticed that it usually takes 8 hours)

9. Log in to your Flying Cart Headquarters. Go to Marketing > Advanced Tools. Enter in the Google FTP username and password that you created in the previous step. Hit “Save Settings”.

10. You are now ready to submit your products. Click “Submit Products to Google”.

Enjoy your products in Google!

Having Problems?

Google product search definitely has a few quirks. If you are getting error messages. Please try the following

1. Go into your Google Merchant Setting (see Step #4 above) and make sure you put in the proper website URL. If you use a custom domain enter your web url in (ex. www.mystore.com). If you are not using a custom domain put in your Flying Cart subdomain (ex. www.mystore.flyingcart.com).

2. Delete your FTP password in Google and create a new one (Step #8 above), enter in the new FTP Password in the Advanced Marketing section of your Flying Cart store. Submit your Google feed after 24 hours.

Once you’ve completed the steps of creating a Google FTP Account, simply click the “Submit Products to Google” button.

An XML sitemap lets acts like a blueprint or road map for search engines. By using a sitemap, search engines can find all your products and URLs better and faster.

We’ve done all the hard work for you, so you can make a sitemap with a single click!
1. Login to your Flying Cart Store
2. Navigate to the “Marketing” Tab and click on the “Advanced Tools” sub tab
3. Click on the button “Generate Sitemap Now”
4. You are all set, your sitemap has been submitted and the Search Engines Google, Yahoo, and Ask know about it.

Let Google know about it. Lucky for you we let Google know about it every time you generate a sitemap.

Every time you add products or change any content on your store you should generate your sitemap. We also do this automatically for you every 30 days.

Chances are you created an online store to reach a large national or even global audience. However, there are those that prefer to shop locally to either promote local businesses or to pick up purchases locally to avoid shipping costs. In fact 60% of all searches on Google are local based!

To be visible on Google Maps search results you have to submit your business to Google Maps.

The following 6 steps outline how to submit your business to Google Maps:

1. Visit the Google Local Business Center
2. Sign in with your Google/Gmail account
3. Click on “+ Add a new listing”
4. Enter your location, website address, business description, and select the proper categories. Click “Next” at the bottom
5. Enter in your store hours, payment options, and upload a few pictures. Click the “Submit” button at the bottom when done
6. Verify your listing by following Google’s instructions

Marketing with Coupons

The coupon feature is available for any Flying Cart package from Helicopter and up. You can offer savings (as little as 5-10%) to dedicated customers, coupons are an excellent way to stimulate sales. If some products aren’t selling as well as you’d hoped, consider offering a coupon.

Coupons can boost your social networking presence and give back to your customers. Remind your fan club members, Facebook fans, Twitter followers and blog readers that you appreciate their time and offer exclusive coupons. For instance, if you create a coupon just for Facebook it gives fans a good reason to check your page often.

You can also use coupons to incentivize other bloggers or journalists to write about you. Create a coupon specifically for their readership.

First you will need to create them.

Go to Marketing > Give Coupons in your Flying Cart HQ.

Next, choose the type of coupon (percentage coupon or free shipping). A percentage coupon can be a specific discount like 5% that you give your customers off the total purchase price. The percentage discount will not be applied to any of your shipping fees. Free Shipping is just like how it sounds, your customers can type in that coupon code and it will give your customers free shipping.

For a new coupon, add the word to serve as the coupon code, then choose the corresponding percentage for the discount (not relevant if you selected free shipping). The coupon code can be anything like the name of a blogger, the product you are promoting, or a particular month. If you need ideas use our “Random” coupon code generator.

Coupons operate by the coupon code you created above. As your customers checkout at your Flying Cart store and enter in their discount code it will be applied to their total bill.

Yes! Simply specify the coupon code in your Fan Club newsletter and send away!

Anywhere you’d like. Spread word of the coupon over your social networking sites, pass it along in emails, put it on the back of business cards, make riddles out of it, whatever you can dream up. People love deals.

Once you’ve added a coupon, you’ll notice a list of active coupons below the Add New Coupon section. The red X in the far right column of the active coupon list allows one-click removal of any active coupon.

How do I send out coupons to my fans?

Wednesday, December 9th, 2009

Tracey of It Girl Nail Decals just asked “How do I send out coupons to my fans?”

Thanks for the great question Tracey!  Here is how you do it.

Create a Coupon

1. Going to the “Marketing” -> “Give Coupons” section

give-coupons

2. Pick a Coupon type “Percentage Off” or “Free Shipping”.  In this example we are going to do a “Percentage Off” coupon for 10% if they type in “Awesome” and we are going to a make it public (public coupons get displayed off our homepage).  Hit the “Save” button to make your coupon active!

create-coupon

Send a Newsletter

3. Go to “Network” -> “Mail My Fans”

mail-my-fans

4. Enter in a subject, pick a greeting, and send them a message.  Make sure the message tells your fans about your coupon!

newsletter

Click on the “Mail My Fans” button at the bottom and your coupon will be sent to all your fans!

New Feature: Coupons are here!

Tuesday, September 15th, 2009

Buying things on your store just got a little sweeter.  Give your customers coupon codes to receive a discounts on their order.  You can give customers two types of coupons 1) Percentage based and/or 2) Free Shipping.

After creating a coupon code, customers will see a new field to enter a optional coupon code. When they enter a valid coupon code, they’ll see a discount in their total.

This feature is available to all Pro and Super customers.  To use this feature head over to Marketing -> Give Coupons and create a coupon code.

Bonus Feature: Make the coupon public and we will list it on our public store coupons page!

Use Coupons with Google Checkout

Friday, March 6th, 2009

For those of you that use Google Checkout, you can now offer coupons to your customers! Google allows you to create coupons for a percentage off the order total or for a specific dollar value discount.

Here’s how you set up a coupon in Google Checkout:

  1. Log in to your Google Checkout account and go to “My Sales”.
  2. Click on the “Tools” tab at the top, then click on “Coupons” on the left side.
  3. Click on “Create a new coupon”.Create a coupon in Google Checkout
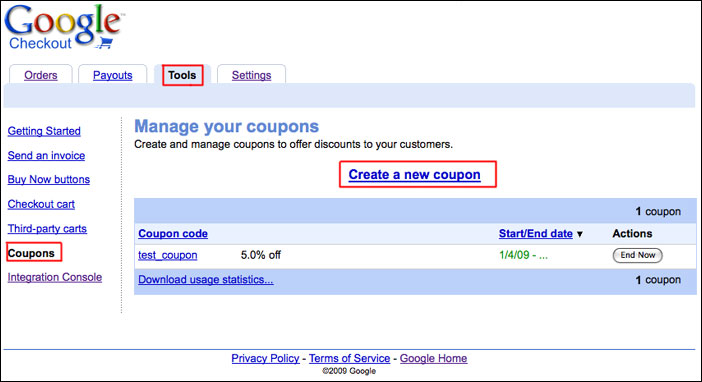
  4. Fill out steps 1-3 to create your coupon and click “Create”.Create a coupon in Google Checkout

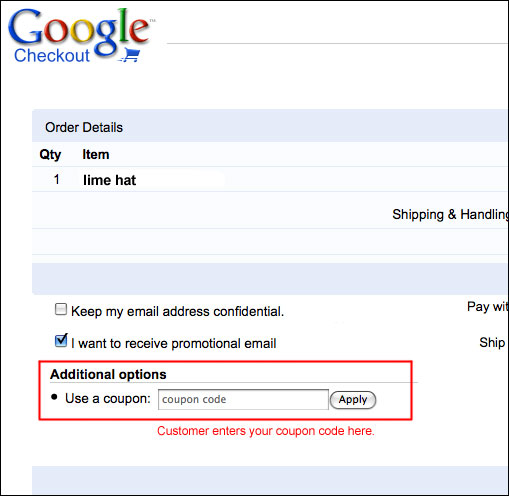
When customers make a purchase with Google Checkout in your store, they will see a place on the order page to enter the coupon code. The discount will be applied right there and the person can pay as usual.

Create a coupon in Google Checkout

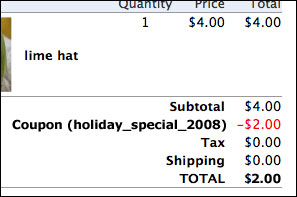
The coupon code and the discount will be shown on the order page in Flying Cart.

Create a coupon in Google Checkout

You can mail out your coupon codes to customers with a fan mailing or offer them to all shoppers by posting the code on your site. You could even mail a special coupon code in your shipping notifications to try to get repeat business. You can get pretty creative with your promotions.

You have to use Google Checkout for this, as the service is not offered for PayPal users.  Here are some directions on how to switch to Google Checkout.