![]()
You own a domain name that you bought from GoDaddy! Nice job. Custom domain names are fun.
Here is a step by step video tutorial on how to setup your custom domain:
You can also follow our screen shots and instructions below or watch this video to set it up with your Flying Cart store.
1. Log into your Godaddy.com account. Click on Domains and then Domain Management.

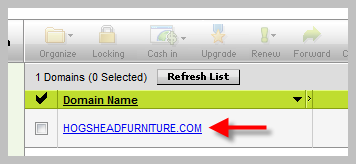
2. Click on the domain you would like to use for your Flying Cart store.
3. Click on Launch underDNS Control.

4. Click the edit button next to www under CNAME. Click Ok when it asks if you are sure you want to modify your CNAME Alias.

5. Enter www for the Alias Name and stores.flyingcart.com for the Points to Host Name. Hit Ok.

6. Click on the Domain tab at the top to return back to the Domains details page.

7. Click on the forward ![]() button and enter in your domain name with http://www. before it. For example if your domain name is MyCoolStore.com then type in http://www.myCoolStore.com. Click the check box next to Enable Forwarding, click the radio button next to 301 Moved Permanently, and hit Ok.
button and enter in your domain name with http://www. before it. For example if your domain name is MyCoolStore.com then type in http://www.myCoolStore.com. Click the check box next to Enable Forwarding, click the radio button next to 301 Moved Permanently, and hit Ok.
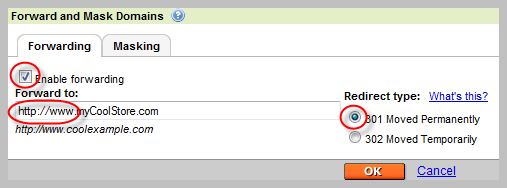
This step allows your customers to be able to type in http://www.myCoolStore.com or http://mycoolstore.com and get to your store.
8. Login to your Flying Cart store headquarters
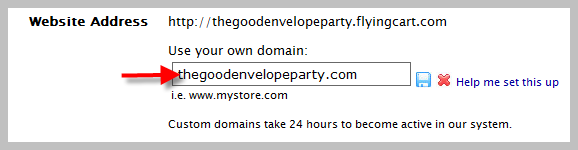
9. Navigate to the Store -> Settings tab and locate the “Website Address” section on the page
10. Type in your domain name under “Use your own domain:”
11. Hit the “Update Settings” button towards the bottom.
12. Wait a full 24 hours