1. Go to Google’s www.Blogger.com
2. Click “Create a Blog”
3. Thats it.
Here is a video of me giving you the top 3 reasons on why you need to start a blog.
1. Go to Google’s www.Blogger.com
2. Click “Create a Blog”
3. Thats it.
Here is a video of me giving you the top 3 reasons on why you need to start a blog.
Google Checkout has just changed their fee structure. Yes it is going to be more expensive ![]()
You can still sign up for free and they have no monthly costs. However they now take a larger cut on each sale (pretty much the same as PayPal).
Here is the new fee structure:

You can read more about the changes on the Google Checkout Seller Fees page. Remember you always create a store on Flying Cart and use Google Checkout in seconds.
We love designers. Designers make us look better. They make things look beautiful.
We are looking to feature designers right off our homepage. This is a great place for our new customers to learn about your design services.
If you are a designer and want to be featured please send us an email.
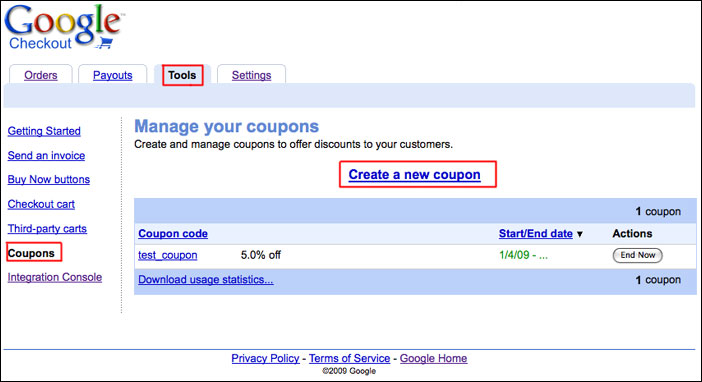
For those of you that use Google Checkout, you can now offer coupons to your customers! Google allows you to create coupons for a percentage off the order total or for a specific dollar value discount.
Here’s how you set up a coupon in Google Checkout:

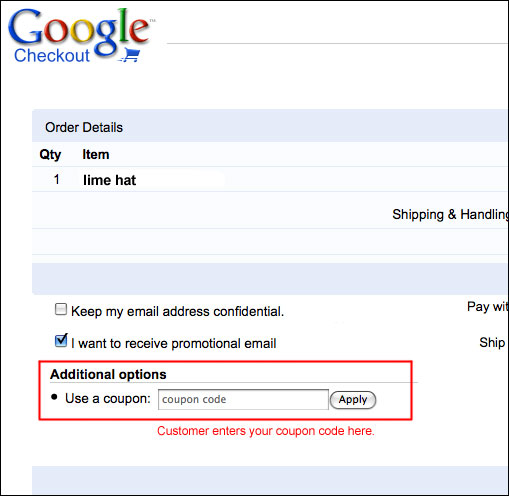
When customers make a purchase with Google Checkout in your store, they will see a place on the order page to enter the coupon code. The discount will be applied right there and the person can pay as usual.
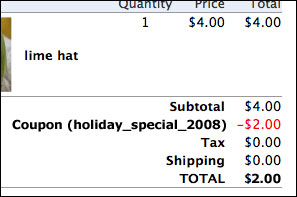
The coupon code and the discount will be shown on the order page in Flying Cart.
You can mail out your coupon codes to customers with a fan mailing or offer them to all shoppers by posting the code on your site. You could even mail a special coupon code in your shipping notifications to try to get repeat business. You can get pretty creative with your promotions.
You have to use Google Checkout for this, as the service is not offered for PayPal users. Here are some directions on how to switch to Google Checkout.

I live in Austin and Rishi lives in Chicago. We only see each other in person about 3 times per year. This week Rishi came to Austin for our Texas meetup tour and after spending some time together it came to our attention that we have very similar tastes in fashion. Here we are both wearing our favorite “work-at-home” outfits. It’s good when the two founders of a company are on the same page, right?
I’m in Texas this week hanging with Margo and hopefully YOU!
Here is our Schedule
All of them start at 7pm.
3/2 Monday – Austin http://www.meetup.com/Online-Selling-Beyond-eBay-Austin/
3/3 Tuesday – Houston http://www.meetup.com/Online-Selling-Beyond-eBay-Houston/
3/5 Thursday – San Antonio http://www.meetup.com/Online-Selling-Beyond-eBay-San-Antonio/
Looking forward to seeing you. Let me know if you have any questions.
If you are using a banner logo in your store, it looks best when the banner fills up the whole top section of the page. This is especially true when the background color of your banner is a different color than the background color of the body. To make your logo fill the top part of the page, all you have to do is:
Upload a logo image that is 800 pixels wide
Our stores Aylio and El Esqueleto are doing this already. If you need an image editor, I recommend Adobe Photoshop or Pixlr which is online and free. This small change will make a huge difference in the professional look of your store.
Kristen Cast of Organic Faith Photography asked me how she can add an animoto widget to her homepage. I get this question a lot so I though it was time to do a blog post.
You can use this guide to add a widget from slide, animoto, photobucket, myspace, etc.
1. Copy the embed code from the site with widget (it will look like a bunch of code)
2. Login to the Flying Cart headquarters navigate to Store -> Homepage
3. Scroll down the click on the HTML button in the “Welcome Text” section (The HTML button is located in all sections where you can add text, not just the Welcome Text section… so feel free to embed widgets on your about us page as well)

4. Paste the embed code you copied in step #1 and click on the “update”

5. Click the “Update Homepage” button on the Flying Cart Homepage Setting.
6. Enjoy the widget on your site
Follow these detailed instructions for embeding a YouTube Video.