Tips for Creating an Online Store

Archive for the ‘Help & Support’ Category

Register.com Custom Domain Instructions

Saturday, December 22nd, 2007

Register.com LogoYou have a domain name from Register.com.  We love custom domains, a great way for customers to remember your store.  Follow the steps below to get it working with your Flying Cart store.

1. Login to Register.com.

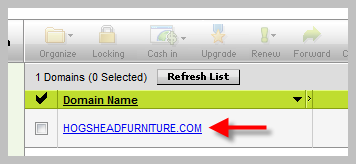
2. Click on your Domain Name that you wish to use (i.e. mystore.com).

3. Scroll down and under the “Advanced Technical Details” section click on “Edit Domain Alias (CNAME)”.
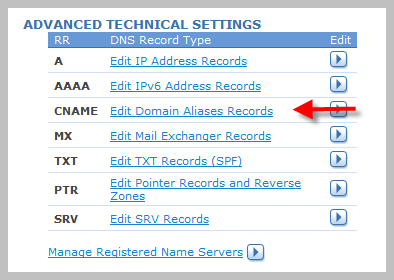
Register.com Advanced Technical Details

4. Enter in “www” right before your domain name and in the next field over enter “stores.flyingcart.com.” Click the “Continue” button twice to confirm your changes.

Register.com Domain Alias

5. Click on “Web Site Forwarding”.  This is a paid option in Register.com, you will need to purchase this.

Register.com Website Forwarding

6. Enter in “www” and enter in your domain name with http://www. before it.  For example if your domain name is sassyc.com then type in http://www.sassyc.com.  Click the “Continue” button twice to confirm your changes.
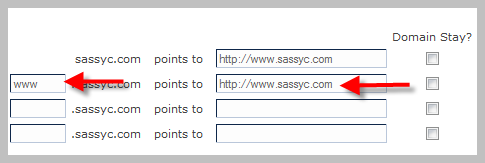
www forwarding

This step allows your customers to be able to type in http://www.myCoolStore.com or http://mycoolstore.com and get to your store.

7. Login to your Flying Cart store headquarters and navigate to the Store -> Settings tab and locate the “Website Address” section on the page.

8. Type in your domain name under “Use your own domain:”.

Enter Website Address

9. Hit “Update Settings” button at the bottom of the page.

10. Wait a full 24 hours.

GoDaddy Custom Domain Instructions

Saturday, December 22nd, 2007

GoDaddy Logo

You own a domain name that you bought from GoDaddy!  Nice job. Custom domain names are fun.

Here is a step by step video tutorial on how to setup your custom domain:

You can also follow our screen shots and instructions below or watch this video to set it up with your Flying Cart store.

1. Log into your Godaddy.com account. Click on Domains and then Domain Management.

2. Click on the domain you would like to use for your Flying Cart store.

Click on the Domain GoDaddy Screen Shot

3. Click on Launch underDNS Control.

4. Click the edit button next to www under CNAME. Click Ok when it asks if you are sure you want to modify your CNAME Alias.

edit-button

5. Enter www for the Alias Name and stores.flyingcart.com for the Points to Host Name.  Hit Ok.

6. Click on the Domain tab at the top to return back to the Domains details page.

Flying Cart Domain Tab

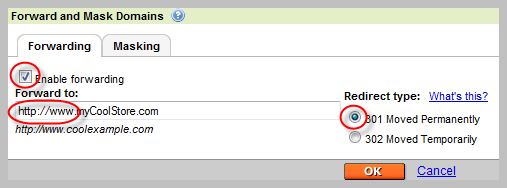
7. Click on the forward GoDaddy Forward Button button and enter in your domain name with http://www. before it.  For example if your domain name is MyCoolStore.com then type in http://www.myCoolStore.com. Click the check box next to Enable Forwarding, click the radio button next to 301 Moved Permanently, and hit Ok.

GoDaddy Forwarding Screen

This step allows your customers to be able to type in http://www.myCoolStore.com or http://mycoolstore.com and get to your store.

8. Login to your Flying Cart store headquarters

9. Navigate to the Store -> Settings tab and locate the “Website Address” section on the page

10. Type in your domain name under “Use your own domain:”

Enter Website Address

11. Hit the “Update Settings” button towards the bottom.

12. Wait a full 24 hours

How do I use a custom domain?

Friday, December 21st, 2007

1. You must register your domain name. Companies you can buy from are GoDaddy , myDomain, register.com, etc).  Skip this step if you already own a domain name.

2. Follow the instructions for the company you choose.

Contact us if you have any problems.  We will help you get your custom domain going!

How do I set up social bookmarking for my store?

Friday, December 21st, 2007

AddThis.com is a social bookmarking tool that will allow your customers to share your product pages with the world. These directions explain how to sign up for an AddThis.com account and set it up to work with your Flying Cart store.

  1. Go to http://addthis.com/account.php
  2. Create a free account by entering your email, selecting a username, and choosing a password
  3. *Important* remember your username
  4. Login to your Flying Cart Head Quarters
  5. Navigate to Store -> Settings
  6. Enter in your AddThis username

How do I set up Google Analytics?

Friday, December 21st, 2007

Google Analytics is a great tool that allows you to get detailed statistics on who has visited your site. These directions explain how to sign up for a Google Analytics account and set it up to work with your Flying Cart store.

  1. Go to http://www.google.com/analytics
  2. If you already have a Google account (for Gmail, Blogger or any other Google product), sign in with your existing account and skip to step 4. If you don’t have an account, click “Sign Up Now”.
  3. Fill out the required information and click “I accept. Create my account”.
  4. Click “Sign Up >”.
  5. Enter your website URL (such as “mystore.flyingcart.com”), Account Name, and Time Zone.
  6. Enter in your contact information (optional) and click “Continue”.
  7. Accept the Google Analytics Terms of Service and click “Create New Account”.
  8. Write down the tracking code, it should look something like this: UA-1234567-1.
  9. Log in to your Flying Cart Headquarters.
  10. Navigate to Store -> Settings.
  11. Scroll to the Google Analytics section at the bottom and enter in the tracking code Google gave you in step 8. Click “Update Settings”.
  12. Allow 4-5 hours for Google Analytics to start tracking your site. Then log in to your Google account to see how many visitors are coming to your site!

How do I Create a Sitemap

Friday, December 14th, 2007

A sitemap lets search engines find all your products and URLs better and faster.

Step 1: Login to your Flying Cart Store

Step 2: Navigate to the “Marketing” Tab and click on the “Advanced Tools” sub tab

Step 3: Click on the button “Generate Sitemap Now”

Step 4: You are all set, your sitemap has been submitted and the Search Engines Google, Yahoo, and Ask know about it.

How To Create an Online Store

Wednesday, December 5th, 2007
  1. Choose a niche or product genre that you are in love with. Your passion and enthusiasm for a particular topic will give you a competitive advantage over larger sellers that are forced to be more broad in their product coverage. By choosing a category that you are excited about, you will have a better chance of enjoying the adventure of creating and managing an online store, which will require patience and the ability to overcome adversity. In a way, opening an online store around one of your hobbies or interests allows you to be productive and spend time on your hobby.
  2. Select a service to provide the online infrastructure for your web store. Don’t waste time and money on hiring 3rd party developers in figuring out the logistics in creating an online store. Pick a solution that can get you in minutes and doesn’t require programming knowledge. FlyingCart allows you to start an online store and carry and fulfill your own physical inventory.
  3. Build-out your product inventory by adding products to your web store. Try to be thoughtful about your product categories. Studies have shown that consumers are drawn to products featured at the top of the page, so be careful to put the most likely sellers at the top. Put yourself in the customer’s shoes with a relentless passion. Remember, people can buy from anyone; why should they buy from you? You need to make their life easier or provide some other kind of value.
  4. Promote your store, as this is a critical step. Do you remember Field of Dreams? “if you build it they will come” will not apply to your new store! You must drive interest in your own site; no one cares about your online store except you. The first way to promote your store is to get relevant; use a sitemap generator to create a roadmap for top search engines like Google and Yahoo to index your page. Put your products on Google Product Search. Network with other online stores and leverage their customer base to gain traction to your store. Also adding more products will increase your probability of becoming relevant on the web. Get the word out by e-mailing all your friends about it, so they can mention it to other friends and family.