Tips for Creating an Online Store

Archive for the ‘Flying Cart Features’ Category

New Feature: Embed Your Products!

Monday, July 27th, 2009

Allow bloggers/publishers/YOU to easily display your products on any website. 

Check out this video tutorial on what this feature is and how to use it:

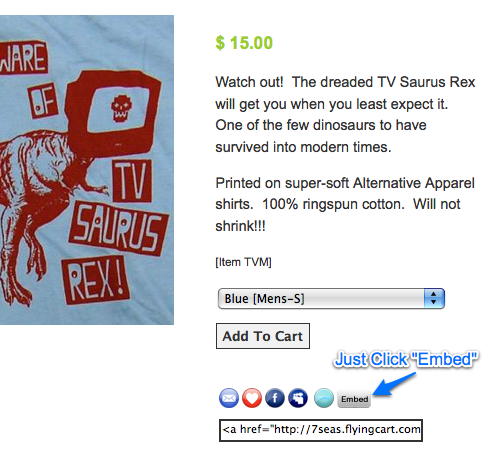
This is what an embedded product looks like:

The embed button is right next to the share links located on all stores:

embed-button

Find out what your customers are searching for

Thursday, July 2nd, 2009

We recently added the search box to all Flying Cart stores, but are you curious what your customers are searching for?  Wouldn’t it be nice to target your marketing efforts by being able to focus on products that you know they want? Now you can do that.

Our latest feature is a Search Statistics page where you can see a log of the last 200 searches done in your store.  Click on Marketing > Search Statistics in your Headquarters. For each search you will see the date and time of the search, the search term, and the user’s IP address.  This last field is the unique internet address of the user’s computer and you can use this to identify if the same user is doing a lot of different searches.

Note that the search logging begins today, July 2, 2009 so the data will be collected from this date forward.

Add custom content to your department pages

Monday, June 29th, 2009

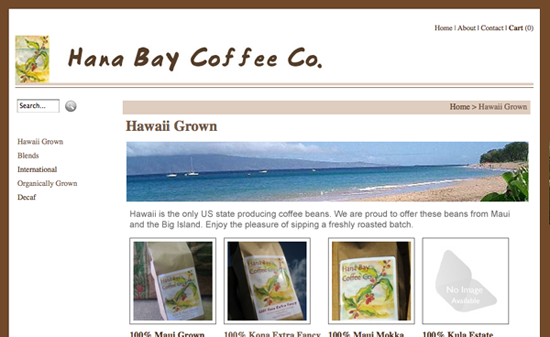
You can now add custom content to the top of your department pages.  Add an image or write some descriptive text to give your pages some personality.

Here’s an example using Hana Bay Coffee (hanabaycoffee.flyingcart.com). I added an image to illustrate the “Hawaii” concept on this page and I wrote a few sentences about the Hawaiian beans.
dept_description

Here’s how to do it:

1. Log in to your heaquarters and go to the Products > Departments page.

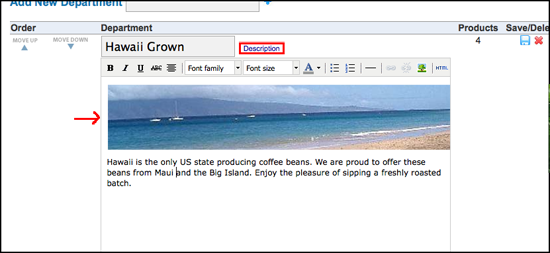
2. Click on the word “Description” next to the department name and an HTML editor will appear.

3. Enter your content into the editor. If you want to insert an image, you can use one of the images you uploaded on your custom CSS page or you can link to an image that you have hosted elsewhere (try <a href=”http://www.flickr.com” target=”new”>Flickr</a>).

4. When you are done, click the blue disk icon next to the department to save your changes.

5. Go to your store and check out the department page. How does it look?
dept_description2

How do I delete a fan?

Monday, June 8th, 2009

I get this question a lot. The answer is that store owners can’t delete fans. If you are a fan, you can choose to remove yourself from being a fan of a store or you can delete your account.  Here’s how to do it:

1. First log in to a Flying Cart store with your fan login.

2. Click on Profile to view your fan profile.

3. To remove yourself from a store fan club, click “Edit my Profile”.  Then scroll to the bottom where all your favorite stores are listed and click on the red X button next to the store that you want to remove.

4. To delete your whole fan account, click “Delete my account” at the bottom of the page.

Did you know…? Everyone with a Flying Cart store can use their account login to log in to the fan club of any other Flying Cart store. There is no need to create a separate fan account if you already have a store account.

Change the order of departments

Friday, May 15th, 2009

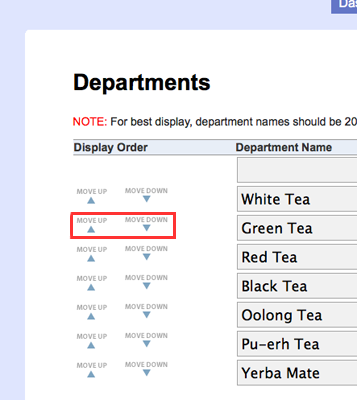
You can now change the order that departments are listed in your store.  Log in and go to the Products > Departments page.  Each department has a “Move Down” and “Move Up” button next to it. Use these buttons to organize the list in the exact order that you want it to be displayed in your store.

Departments page screenshot

Hot off the press: Store Search Box!

Monday, May 11th, 2009

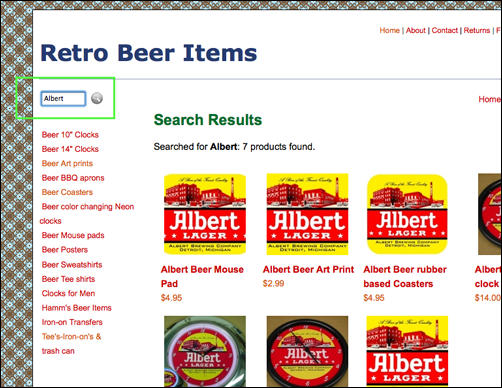
It’s been in the works for a long time and we’re happy to announce that our newest addition is a search box in each Flying Cart store. This should help your customers find exactly what they are looking for. You can find the search box above the list of department names on the left side of the screen in your store. Search results come from the following fields (in order): product name, product description, department name, brand name, item number.  You may want to tweak the content of these fields to improve your store search results.

In the following example, I searched for “Albert” at Retro Beer Items (retrobeeritems.flyingcart.com) and it brought back seven related products. Cool!

Search at Retro Beer Items

This has been one of our most requested features ever.

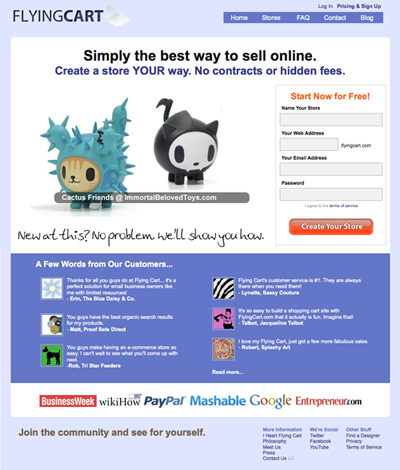
We have a new look

Thursday, April 9th, 2009

Last week we launched a shiny new Flying Cart website. A site needs to reflect a company’s personality like the clothes we wear. The old site had us stuck in the clothes that our mother dressed us in and we wanted something new. It took some hard self-reflection but we came out with a new look that we really like. The new site is lighter, more colorful, and more playful.

Besides the new colors and layout, some of the major changes to the site include: more featured stores, new testimonials, an updated pricing structure, and a new sign-up page. The Headquarters pages and the blog also match the new site design, for a seamless Flying Cart experience.

If you are interested in getting a custom design for your Flying Cart store, take a look at the new “Find A Designer” page. We have partnered with several freelance designers and companies who will create custom designs for Flying Cart stores at a good price.

Go explore the site and see what else is new.

Use Coupons with Google Checkout

Friday, March 6th, 2009

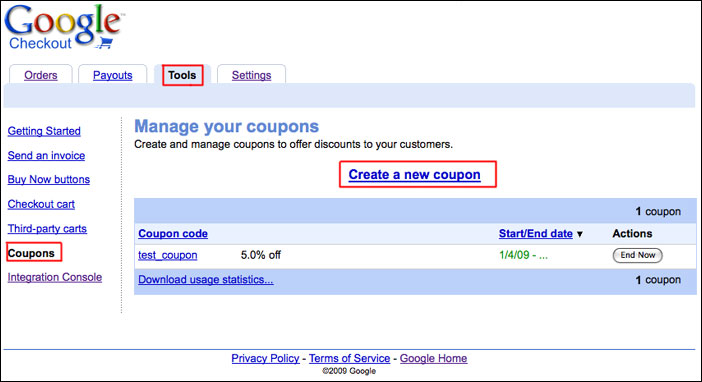
For those of you that use Google Checkout, you can now offer coupons to your customers! Google allows you to create coupons for a percentage off the order total or for a specific dollar value discount.

Here’s how you set up a coupon in Google Checkout:

  1. Log in to your Google Checkout account and go to “My Sales”.
  2. Click on the “Tools” tab at the top, then click on “Coupons” on the left side.
  3. Click on “Create a new coupon”.Create a coupon in Google Checkout
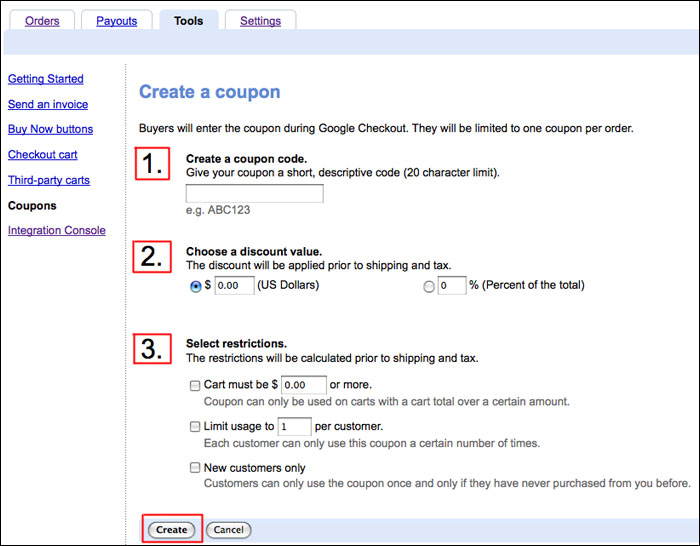
  4. Fill out steps 1-3 to create your coupon and click “Create”.Create a coupon in Google Checkout

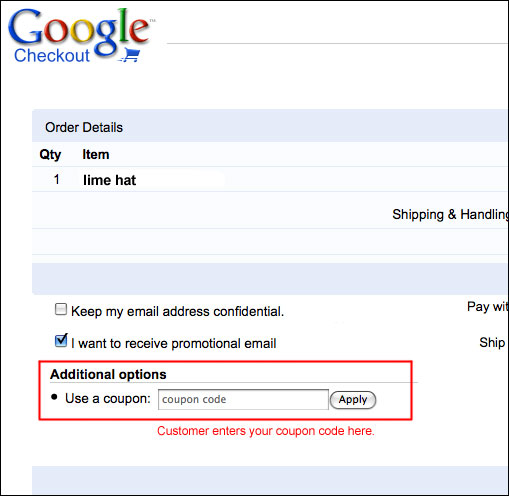
When customers make a purchase with Google Checkout in your store, they will see a place on the order page to enter the coupon code. The discount will be applied right there and the person can pay as usual.

Create a coupon in Google Checkout

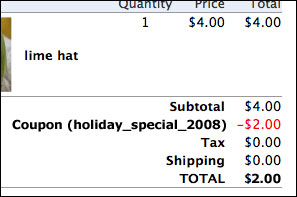
The coupon code and the discount will be shown on the order page in Flying Cart.

Create a coupon in Google Checkout

You can mail out your coupon codes to customers with a fan mailing or offer them to all shoppers by posting the code on your site. You could even mail a special coupon code in your shipping notifications to try to get repeat business. You can get pretty creative with your promotions.

You have to use Google Checkout for this, as the service is not offered for PayPal users.  Here are some directions on how to switch to Google Checkout.

New on the Dashboard… Action Items

Thursday, January 29th, 2009

Did you notice the new yellow box on the Dashboard? The action items box is where you should look to see items that require you to do something. It shows you if you have any outstanding orders for which you have received payment but have not yet shipped. Use this tool to help you manage order fulfillment. The box also shows you if you have any outstanding partner requests – that is, if someone wants to partner with you or if you are waiting to hear back from others that you want to partner with.

If you use Facebook, this might remind you a little of the notifications box that they use in the upper right corner of your homepage when you log in to tell you about friend and application requests, updates, etc. We will add more types of notifications to this box in the future.

Not sure what to do next? Consult the new task checklist.

Wednesday, January 28th, 2009

It’s easy to create a basic store website with Flying Cart, but how do you create an amazing store and a successful business? Not quite as easy. Our new store to-do checklist guides you through the process of building and marketing your store one step at a time. We have selected 20 tasks that we believe are most crucial to your success.

Store Checklist

Next time you log in to your store, you will see the checklist at the top of the screen on the Dashboard. Tasks will automatically get checked off as you complete them, or you can check them off on your own. Your progress will appear as a percentage on the progress meter.  You can hide the checklist at any time by clicking the X button in the top right corner.

Star Seller Get Flying Cart Star Seller status by completing everything in the list.