Tips for Creating an Online Store

Posts Tagged ‘google’

3 Ways to Boost Traffic to Your Online Store

Thursday, October 14th, 2010

1. Add Keywords in Your Website Title

One of the most effective ways to get natural search results on Google, Yahoo, or Bing is to add your online store’s main keywords in your website title. Search Engines analyze the page’s title and heading to properly index them. Having a relevant title will allow your website to be more visible in search results.

A keyword is anything that specifically describes the products being sold or that describes the store itself. For example, if you sell Organic Shea Butter Lotion your website title should be “Organic Shea Butter Lotion – Samantha’s Lotion Store”.

Your website title is located at the top of your browser.

You can manually add/change the keyword specific title into your source code with the title tag around it:

Special note for Flying Cart stores: You can edit your website title easily in your store headquarters under Marketing > Basic Tools.

2. Verify your store with Google

1. Visit the Google Webmaster Central website at: http://www.google.com/webmasters/
2. Click on “Sign into Webmaster Tool” and sign in with your Google/Gmail account. If you don’t have a Google account, sign up for one. It’s free!
3. Click on “Add a site…”.

4. Enter your store’s web address.

5. Verify the site. You can either do this by adding the line of code Google provided you or by uploading an HTML to your main directory.

6. Once you add the verification code click on the “Verify” button.

By following these steps, there is no excuse to wonder why your store doesn’t show up in Google.

Special note for Flying Cart stores: In step 5, choose the “Meta Tag” option and enter that in the Google verification section under “Marketing” > “Basic Tools”.

3. Manually Add Your Online Store to Every Search Engine

The following are links to the three largest search engines where you can manually add your store.


http://www.google.com/addurl/?continue=/addurl


http://www.bing.com/webmaster/SubmitSitePage.aspx


http://siteexplorer.search.yahoo.com/submit

[Video] Google’s FREE Local Business Center

Friday, June 12th, 2009

Google Local Business Center

Video of me explaining why you need to put your business on Google Local Business Center now!

65% of all Searches are Local!

Tuesday, May 19th, 2009

I just learned that 60-70% of all searches are local!

So now that we know that what should we do about it?

Advertise locally via Google. Go to Google Adwords and target your ads to a local area and in your ad copy write the city name.  Most local based business don’t advertise online so you can definitely use this to your advantage.

Feel free to ask me any questions on this strategy in the comments.

How to Start a Blog

Friday, March 13th, 2009

1. Go to Google’s www.Blogger.com

2. Click “Create a Blog”

3. Thats it.

Here is a video of me giving you the top 3 reasons on why you need to start a blog.

How Much Does Google Checkout Cost?

Thursday, March 12th, 2009

Google Checkout has just changed their fee structure.  Yes it is going to be more expensive :(

You can still sign up for free and they have no monthly costs.  However they now take a larger cut on each sale (pretty much the same as PayPal).

Here is the new fee structure:

You can read more about the changes on the Google Checkout Seller Fees page.  Remember you always create a store on Flying Cart and use Google Checkout in seconds.

Use Coupons with Google Checkout

Friday, March 6th, 2009

For those of you that use Google Checkout, you can now offer coupons to your customers! Google allows you to create coupons for a percentage off the order total or for a specific dollar value discount.

Here’s how you set up a coupon in Google Checkout:

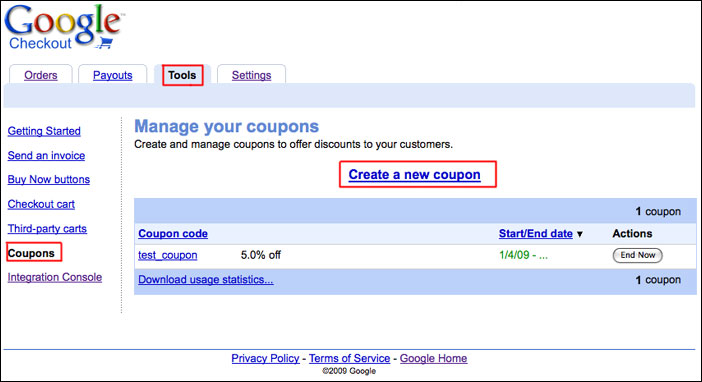
  1. Log in to your Google Checkout account and go to “My Sales”.
  2. Click on the “Tools” tab at the top, then click on “Coupons” on the left side.
  3. Click on “Create a new coupon”.Create a coupon in Google Checkout
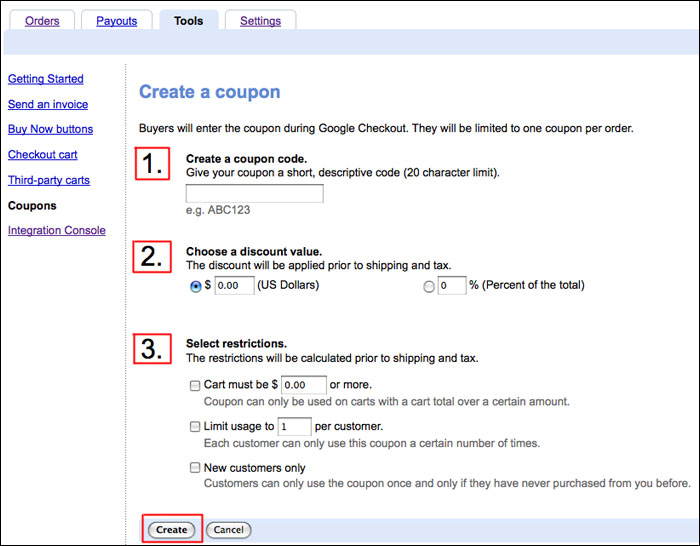
  4. Fill out steps 1-3 to create your coupon and click “Create”.Create a coupon in Google Checkout

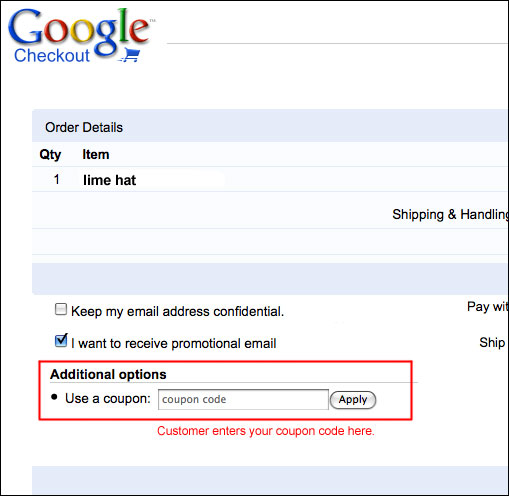
When customers make a purchase with Google Checkout in your store, they will see a place on the order page to enter the coupon code. The discount will be applied right there and the person can pay as usual.

Create a coupon in Google Checkout

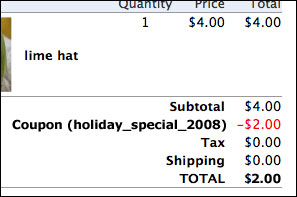
The coupon code and the discount will be shown on the order page in Flying Cart.

Create a coupon in Google Checkout

You can mail out your coupon codes to customers with a fan mailing or offer them to all shoppers by posting the code on your site. You could even mail a special coupon code in your shipping notifications to try to get repeat business. You can get pretty creative with your promotions.

You have to use Google Checkout for this, as the service is not offered for PayPal users.  Here are some directions on how to switch to Google Checkout.

How to Create a Facebook Fan Page

Friday, February 20th, 2009

Facebook is a great place to gain more awareness about your brand.  You can create a Fan Page for your product or company and have facebook users become fans of it.  Everytime a new fan joins your fan club all their friends are alerted giving more exposure to your product.

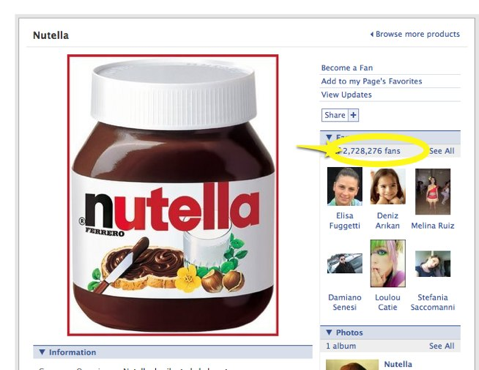
Nutella has over 2.7 MILLION fans on facebook.  That is a lot of people that said they love Nutella (disclosure: Nutella is soooo good and I have it with my toast every morning).  Do you think Nutella saw a rise in business?  I think so.  Even getting 25-50 Facebook fans is a HUGE acheivement in mind.

Here is how you can create your Facebook Fan Page:

1. Go here http://www.facebook.com/advertising/?pages

2. Click on “Create A Page”

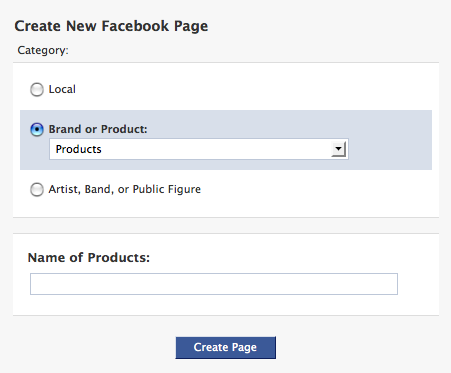
3. Pick a category.  For our customers I would suggest the “Brand or Product” category.

4. Pick a specific category in the drop down

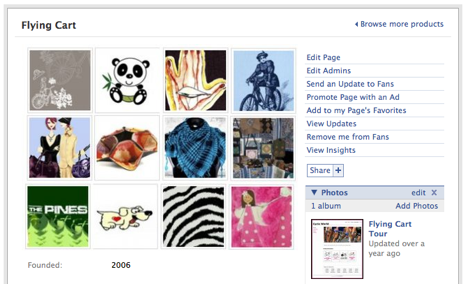
5. Enter in the name of your product or online store (For example in our case we put Flying Cart, if you sell resistance bands I would put in “Resistance Bands” this way you can attract a wider audience of people into fitness).

6. Click on “Create Page”

7. Login to Facebook.  (You don’t have an account?  OMG … ARE YOU SERIOUS? just kidding… you can create one easily for free)

8. Upload pictures of your products

9. Add videos of your products and you!

10. Invite all your facebook buddies to your fan club

Also note that Facebook Fan Pages are indexed by Google so its another great SEO trick.

Check out the Flying Cart fan page. Become a fan of us too!

Feel free to invite me to your fan page, I’d love to join.

New: Google Payment Manager

Thursday, January 8th, 2009

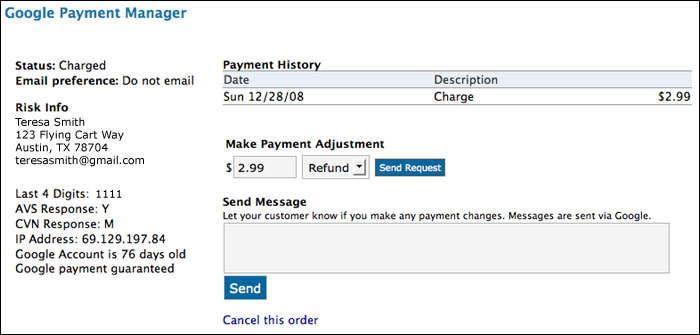
You can now take care of all Google payment management from within Flying Cart. Look for the Google Payment Manager link on the bottom of each order page in the Headquarters. You can view the order payment history, monitor the payment status, send refunds, send messages, cancel an order, and view the risk level of the customer’s payment method.  The data shown on this screen matches what is in your Google Checkout account in real-time so this new feature can save you the trouble of going back and forth.

New order features

Get found on Google Maps

Thursday, November 13th, 2008

Google Maps LogoAdd your store to Google Maps. A 2 minute thing you can do today to put your store on the map! woohoo

How do I setup Google Checkout?

Wednesday, October 29th, 2008

Google Checkout LogoGoogle Checkout allows you to accept credit card payments using a (free) Google account. In our experience, it is easier to use and more reliable than PayPal for a nearly identical functionality. Read more about Google Checkout here.

Follow these steps to use Google Checkout on your store.  Feel free to download and print these instructions out.

1. Sign up for a Google Merchant account.  It is free and easy.

Please Note: Google will make a small deposit in your bank account and you will need to verify the amount in order to complete your sign up.  This will take a day or two.

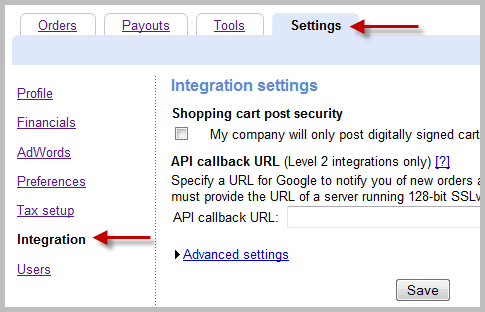
2. Login to your Google Checkout account and go to “My Sales”. Click on the “Settings” tab and then click on “Integration” on the left.

Google Checkout Settings tab

3. Make sure “My company will only post digitally signed carts.” is unchecked.

Google Checkout Digital Signage

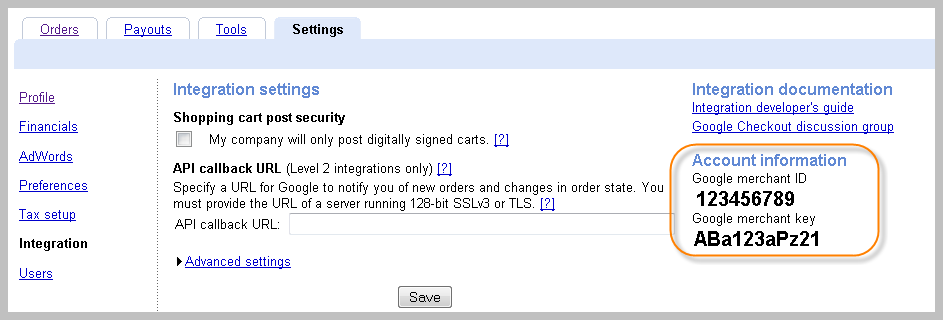
4. Locate your Google merchant ID and Google Merchant Key on the right side of this page.

Google Merchant ID

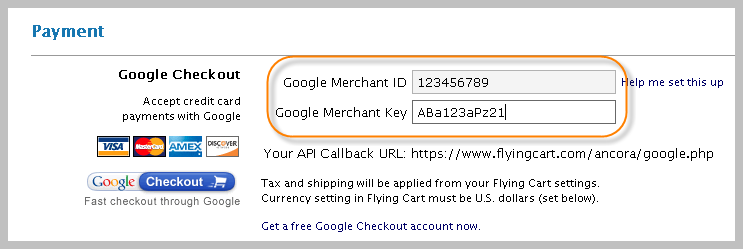
5. Login to your Flying Cart store headquarters (in a new browser window).  Go to your “Store” -> “Settings” tab.  Scroll down to the Payment section and enter in your Google Merchant ID and Google Merchant key that you got from Step #4.

Add Google Merchant Key

6. Double check that your Google Merchant ID & Key that you copy/pasted into your Flying Cart settings section is exactly what Google Checkout gave you.

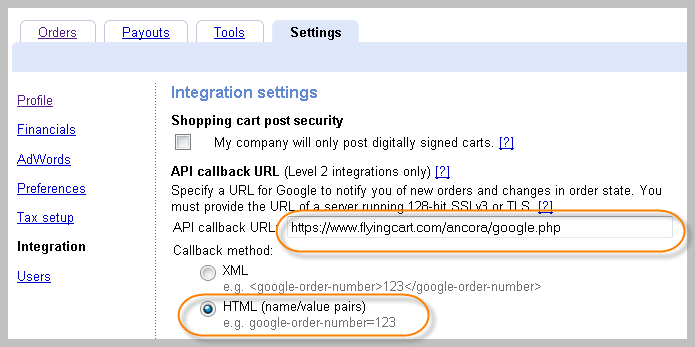
7. Highlight your API Callback URL from the Google Checkout section and go to Edit > Copy in your browser to copy it. Scroll down the page and click “Update Settings” at the bottom.

Google Checkout API Callback URL

8. Go back to the window with your Google Settings and paste the API Callback URL into the field on that page.  Select “HTML (name/value pairs)” as the callback method.  Hit “Save”.

9. Go to your store, put something in your cart and notice that Google Checkout is now an option. Enjoy!

Google Checkout