Tips for Creating an Online Store

Posts Tagged ‘help’

How to integrate your UPS account with PayPal

Wednesday, February 24th, 2010

If you want to use your UPS settings to handle your shipping you can easily override the Flying Cart shipping settings and use them.  Here is how you can setup PayPal to use your UPS settings.

1.Login to your PayPal account and click on “Profile” -> “More Options”

2. Click on”Shipping Preferences”

3. Click on “Add new or existing UPS account”

How do I setup shipping?

Thursday, February 11th, 2010

1. Login to your store Headquarters and navigate to Store -> Shipping

2. Determine if you are going to charge based on weight or price and click the save icon.  If you choose weight you will need to add weight values to each product.  In this example we will choose price (weight works the exact same way).

3. Pick a shipping location and click the “+” icon to add it.  This is what your shipping values will be for that location.  In this example I picked “United States”.

4. Enter in what shipping rates you would like to apply per price range and click the save icon button.  For example if you want to charge $5 shipping if the total cost of the purchase is between $0 – $20 then the range would be from $0-$20 and the rate would be $5.00.

5. Enter in the next shipping range and click the “+” button.  In this example I want to charge $8.00 shipping if the total cart value is between $20.01 – $100.00.

6. Keep adding shipping ranges just like in step #5 until you are satisfied.  If the shipping amount exceeds any shipping range that you haven’t specified then by default the highest range amount will be applied.  For example in the example above if a customer has a total of $150.00 then an $8.00 shipping charge will apply.

7. Select another country to specify shipping ranges to and click the “+” button.  In this example I’m going to pick Italy.

8. Repeat steps #4 and #5 for the new location

9. If you want to ship to any location pick the location “Everywhere”.  The “Everywhere” location will be applied to any location you haven’t specified.  For example if your specify shipping ranges for United States, Italy, and Everywhere and a customer checkouts out from India then the “Everywhere” shipping range will be applied.  If the customer checks out from United States the United States shipping ranges will apply.

Customer claims they paid… but you never got the order. What should you do?

Friday, April 17th, 2009

Angela of Little Bow Peep asked me

“I had someone email me and say they placed an order for several things and never received any of it yet. What should I do if I know an order hasn’t been placed? What should I do if the person demands their products but never paid for any of it?”

That is a great question.  Also challenging.  The customer obviously wants your product so you don’t want to turn them away.

Here is what I would do:
1) Be certain that you didn’t get the money.  Triple check in your Flying Cart order section.  Check all your PayPal and Google Checkout records.
2) Apologize and ask the customer for proof of the order.  An electronic receipt or amount charged on their credit card would do.
3) Call them up and talk to them over the phone. If the still are making demands with no proof ask them to order something else and you will ship the other items at cost.

What would you do?  All ideas/comments welcome.

How can I charge in a different currency?

Tuesday, April 14th, 2009

1. Go to Store -> Settings.
flyingcart-store-settings

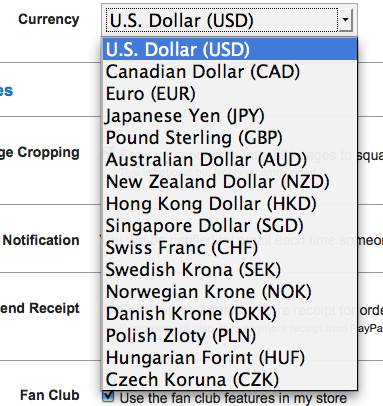
2. Scroll down to the currency section and pick the currency that you charge in.

currency

3.  Click on “Update Settings” at the bottom of the page to save your changes.

How to Add Links in Your Description

Wednesday, April 8th, 2009

Kim of Savannah Gourmet Market asked me “How do I add links within a product description”.

1. Go to the product that you want to edit.

2. Click on “Edit”

edit

2. Highlight the text you want to link

highlight

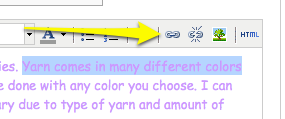
3. Click on the link button

link-button

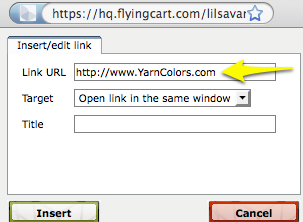
4. Enter in the link address and hit “Insert”

yarncolors

How to Delete an Image

Friday, February 20th, 2009

You uploaded an image and now you want to remove it.  Follow these steps to delete it.

1. Login to your store HQ.

2. Go to Products -> Browse

product-browse

3. Click on the product with the image you want to delete

4. Scroll down to the image section and click on the Red “X” underneath the image you want to delete.

How do I set up Google Analytics?

Friday, December 21st, 2007

Google Analytics is a great tool that allows you to get detailed statistics on who has visited your site. These directions explain how to sign up for a Google Analytics account and set it up to work with your Flying Cart store.

  1. Go to http://www.google.com/analytics
  2. If you already have a Google account (for Gmail, Blogger or any other Google product), sign in with your existing account and skip to step 4. If you don’t have an account, click “Sign Up Now”.
  3. Fill out the required information and click “I accept. Create my account”.
  4. Click “Sign Up >”.
  5. Enter your website URL (such as “mystore.flyingcart.com”), Account Name, and Time Zone.
  6. Enter in your contact information (optional) and click “Continue”.
  7. Accept the Google Analytics Terms of Service and click “Create New Account”.
  8. Write down the tracking code, it should look something like this: UA-1234567-1.
  9. Log in to your Flying Cart Headquarters.
  10. Navigate to Store -> Settings.
  11. Scroll to the Google Analytics section at the bottom and enter in the tracking code Google gave you in step 8. Click “Update Settings”.
  12. Allow 4-5 hours for Google Analytics to start tracking your site. Then log in to your Google account to see how many visitors are coming to your site!

How To Create an Online Store

Wednesday, December 5th, 2007
  1. Choose a niche or product genre that you are in love with. Your passion and enthusiasm for a particular topic will give you a competitive advantage over larger sellers that are forced to be more broad in their product coverage. By choosing a category that you are excited about, you will have a better chance of enjoying the adventure of creating and managing an online store, which will require patience and the ability to overcome adversity. In a way, opening an online store around one of your hobbies or interests allows you to be productive and spend time on your hobby.
  2. Select a service to provide the online infrastructure for your web store. Don’t waste time and money on hiring 3rd party developers in figuring out the logistics in creating an online store. Pick a solution that can get you in minutes and doesn’t require programming knowledge. FlyingCart allows you to start an online store and carry and fulfill your own physical inventory.
  3. Build-out your product inventory by adding products to your web store. Try to be thoughtful about your product categories. Studies have shown that consumers are drawn to products featured at the top of the page, so be careful to put the most likely sellers at the top. Put yourself in the customer’s shoes with a relentless passion. Remember, people can buy from anyone; why should they buy from you? You need to make their life easier or provide some other kind of value.
  4. Promote your store, as this is a critical step. Do you remember Field of Dreams? “if you build it they will come” will not apply to your new store! You must drive interest in your own site; no one cares about your online store except you. The first way to promote your store is to get relevant; use a sitemap generator to create a roadmap for top search engines like Google and Yahoo to index your page. Put your products on Google Product Search. Network with other online stores and leverage their customer base to gain traction to your store. Also adding more products will increase your probability of becoming relevant on the web. Get the word out by e-mailing all your friends about it, so they can mention it to other friends and family.