Tips for Creating an Online Store

Archive for the ‘Help & Support’ Category

How can I rearrange my products?

Thursday, July 30th, 2009

We just added a new feature that allows you to rearrange your products (on your department and featured section pages) in 4 ways!

1. Newest First

2. Oldest First

3. Least Expensive First

4. Most Expensive First

You can change the way your products are arranged in your store settings section under “Store Preferences”.

product-arrangement3

Here is a quick video going over this new feature:

Happy rearranging!

Network Solutions Custom Domain Name Instructions

Saturday, May 16th, 2009

Follow these instructions if you own a domain with Network Solutions.

1. Login to your Network Solutions account.

2. Click on “Account Manager”

account-manager

3. Scroll Down to the page and select the “Designated DNS” radio button and click the “Apply Changes” button

designated-dns-v2

4. Scroll down the page and click the “Manage Advanced DNS Records” button

manage-advanced-dns

5. Click on “Add/Edit” under “Host Aliases (CNAME Records)”

cname

6. Type in “www” for the alias, select the radio button next to “Other Host” and type in “stores.flyingcart.com” and click on the blue “Continue” button at the bottom.

add-cname-1

7. Login to your Flying Cart store headquarters

8. Navigate to the Store -> Settings tab and locate the “Website Address” section on the page

9. Type in your domain name under “Use your own domain:”

Enter Website Address

10. Hit the “Update Settings” button towards the bottom.

11. Wait a full 24 hours

Customer claims they paid… but you never got the order. What should you do?

Friday, April 17th, 2009

Angela of Little Bow Peep asked me

“I had someone email me and say they placed an order for several things and never received any of it yet. What should I do if I know an order hasn’t been placed? What should I do if the person demands their products but never paid for any of it?”

That is a great question.  Also challenging.  The customer obviously wants your product so you don’t want to turn them away.

Here is what I would do:
1) Be certain that you didn’t get the money.  Triple check in your Flying Cart order section.  Check all your PayPal and Google Checkout records.
2) Apologize and ask the customer for proof of the order.  An electronic receipt or amount charged on their credit card would do.
3) Call them up and talk to them over the phone. If the still are making demands with no proof ask them to order something else and you will ship the other items at cost.

What would you do?  All ideas/comments welcome.

How can I charge in a different currency?

Tuesday, April 14th, 2009

1. Go to Store -> Settings.
flyingcart-store-settings

2. Scroll down to the currency section and pick the currency that you charge in.

currency

3.  Click on “Update Settings” at the bottom of the page to save your changes.

How to Add Links in Your Description

Wednesday, April 8th, 2009

Kim of Savannah Gourmet Market asked me “How do I add links within a product description”.

1. Go to the product that you want to edit.

2. Click on “Edit”

edit

2. Highlight the text you want to link

highlight

3. Click on the link button

link-button

4. Enter in the link address and hit “Insert”

yarncolors

Use Coupons with Google Checkout

Friday, March 6th, 2009

For those of you that use Google Checkout, you can now offer coupons to your customers! Google allows you to create coupons for a percentage off the order total or for a specific dollar value discount.

Here’s how you set up a coupon in Google Checkout:

  1. Log in to your Google Checkout account and go to “My Sales”.
  2. Click on the “Tools” tab at the top, then click on “Coupons” on the left side.
  3. Click on “Create a new coupon”.Create a coupon in Google Checkout
  4. Fill out steps 1-3 to create your coupon and click “Create”.Create a coupon in Google Checkout

When customers make a purchase with Google Checkout in your store, they will see a place on the order page to enter the coupon code. The discount will be applied right there and the person can pay as usual.

Create a coupon in Google Checkout

The coupon code and the discount will be shown on the order page in Flying Cart.

Create a coupon in Google Checkout

You can mail out your coupon codes to customers with a fan mailing or offer them to all shoppers by posting the code on your site. You could even mail a special coupon code in your shipping notifications to try to get repeat business. You can get pretty creative with your promotions.

You have to use Google Checkout for this, as the service is not offered for PayPal users.  Here are some directions on how to switch to Google Checkout.

How to Add a Widget

Monday, February 23rd, 2009

Kristen Cast of Organic Faith Photography asked me how she can add an animoto widget to her homepage.  I get this question a lot so I though it was time to do a blog post.

You can use this guide to add a widget from slide, animoto, photobucket, myspace, etc.

1. Copy the embed code from the site with widget (it will look like a bunch of code)

2. Login to the Flying Cart headquarters navigate to Store -> Homepage

3. Scroll down the click on the HTML button in the “Welcome Text” section (The HTML button is located in all sections where you can add text, not just the Welcome Text section… so feel free to embed widgets on your about us page as well)

1-html-button

4. Paste the embed code you copied in step #1 and click on the “update”

html-source-editor

5. Click the “Update Homepage” button on the Flying Cart Homepage Setting.

6. Enjoy the widget on your site

Follow these detailed instructions for embeding a YouTube Video.

How to Delete an Image

Friday, February 20th, 2009

You uploaded an image and now you want to remove it.  Follow these steps to delete it.

1. Login to your store HQ.

2. Go to Products -> Browse

product-browse

3. Click on the product with the image you want to delete

4. Scroll down to the image section and click on the Red “X” underneath the image you want to delete.

Ask FC: How do I Add a Video?

Saturday, November 15th, 2008

Q: How do I add a YouTube Video to my Welcome Page?

A: First of all.  I love videos!  I really think they bring a store alive.

Follow these steps:

1. Sign in and Upload a video to YouTube (you can use your Google Account to sign in)

NOTE: Skip step #1 if the video you want to use already exists on YouTube.  Feel free to check out other video sharing sites (like 5min, MetaCafe, Blip.tv, and Vimeo) for great video content.

2. Go to the video you just upload and copy the code next to “embed”

YouTube embed code

3. In your Flying Cart headquarters navigate to Store -> Homepage

4. Scroll down the click on the HTML button in the “Welcome Text” section

HTML Button

5. Paste the embed code you copied in step #3 and click on the “update”

HTML Source Editor

6. Click the “Update Homepage” button

7. Enjoy a video on your site

Burning QuestionHave a burning question for us?  Ask Us!

How do I setup Google Checkout?

Wednesday, October 29th, 2008

Google Checkout LogoGoogle Checkout allows you to accept credit card payments using a (free) Google account. In our experience, it is easier to use and more reliable than PayPal for a nearly identical functionality. Read more about Google Checkout here.

Follow these steps to use Google Checkout on your store.  Feel free to download and print these instructions out.

1. Sign up for a Google Merchant account.  It is free and easy.

Please Note: Google will make a small deposit in your bank account and you will need to verify the amount in order to complete your sign up.  This will take a day or two.

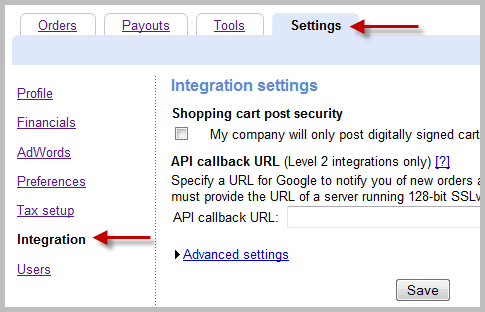
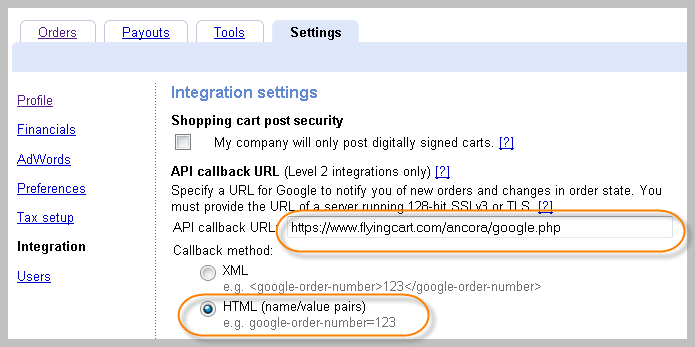
2. Login to your Google Checkout account and go to “My Sales”. Click on the “Settings” tab and then click on “Integration” on the left.

Google Checkout Settings tab

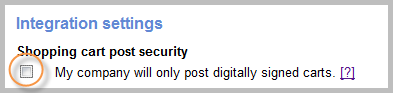
3. Make sure “My company will only post digitally signed carts.” is unchecked.

Google Checkout Digital Signage

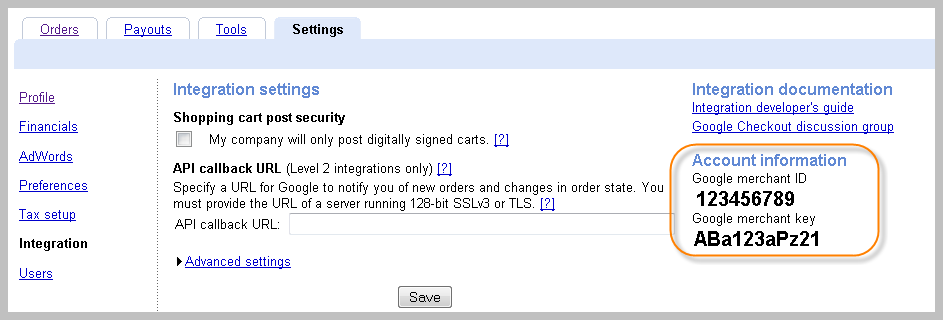
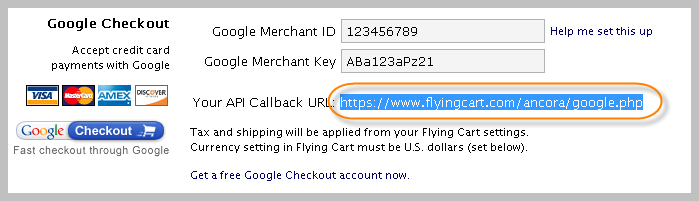
4. Locate your Google merchant ID and Google Merchant Key on the right side of this page.

Google Merchant ID

5. Login to your Flying Cart store headquarters (in a new browser window).  Go to your “Store” -> “Settings” tab.  Scroll down to the Payment section and enter in your Google Merchant ID and Google Merchant key that you got from Step #4.

Add Google Merchant Key

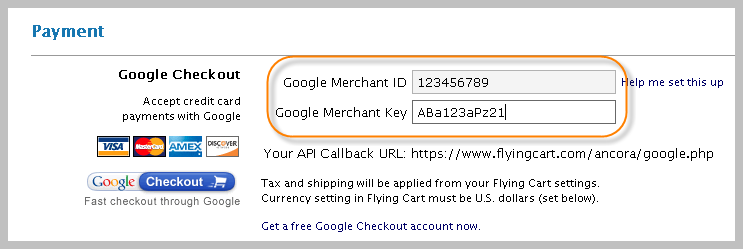
6. Double check that your Google Merchant ID & Key that you copy/pasted into your Flying Cart settings section is exactly what Google Checkout gave you.

7. Highlight your API Callback URL from the Google Checkout section and go to Edit > Copy in your browser to copy it. Scroll down the page and click “Update Settings” at the bottom.

Google Checkout API Callback URL

8. Go back to the window with your Google Settings and paste the API Callback URL into the field on that page.  Select “HTML (name/value pairs)” as the callback method.  Hit “Save”.

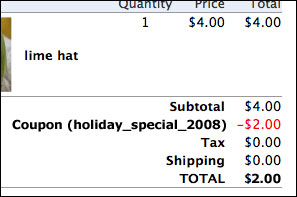
9. Go to your store, put something in your cart and notice that Google Checkout is now an option. Enjoy!

Google Checkout