Tips for Creating an Online Store

Archive for the ‘Help & Support’ Category

Do I need to Charge a Sales Tax?

Wednesday, October 22nd, 2008

In the United States you do not need to charge a sales tax to customers out of your state.

Here are some examples:

Running your business from your home:

Q: I live in Wisconsin and have a home based business (no warehouse or office space).  Do I need to charge sales tax?

A: No. You don’t have to charge any sales taxes.

Running your business from an office/warehouse:

Q: I live in Florida and have a small warehouse where I sell my products out of.  Do I need to charge sales tax?

A: You only need to charge a sales tax to Florida residents.

Running your business from multiple locations:

Q:  I have offices/warehouses in California, Illinois, and Nebraska.  Do I need to charge a sales tax?

A: You need to charge a sales tax to California, Illinois, and Nebraska residents.

MORE INFO:

Internet sales are actually regulated by the federal government because it reaches across state borders. Under current law, states cannot reach beyond their borders and compel out-of-state vendors to collect the tax owed by that state’s residents. What happens is those who buy online are supposed to report it and pay “use tax” in their state, even though it’s not heavily regulated.

Disclaimer: Please check with your state and local tax bureaus.  Local laws change all the time and I’m not a Tax expert.

How do I use my PayPal Tax Settings?

Monday, September 22nd, 2008

If you want to charge tax to customers in your state only OR if you want to charge different tax rates depending on the customer location, we suggest using your PayPal Tax Settings option.  Here are step-by-step instructions:

1. Login to your store headquarters

2. Navigate to “Store” -> “Settings”

flyingcart-store-settings2

3. Scroll down the page  to the “PayPal Checkout” section and select “Use my PayPal tax settings”

PayPal Override Tax Settings

4. Hit “Update Settings” at the bottom of the page to save your changes

5. Login to your PayPal account

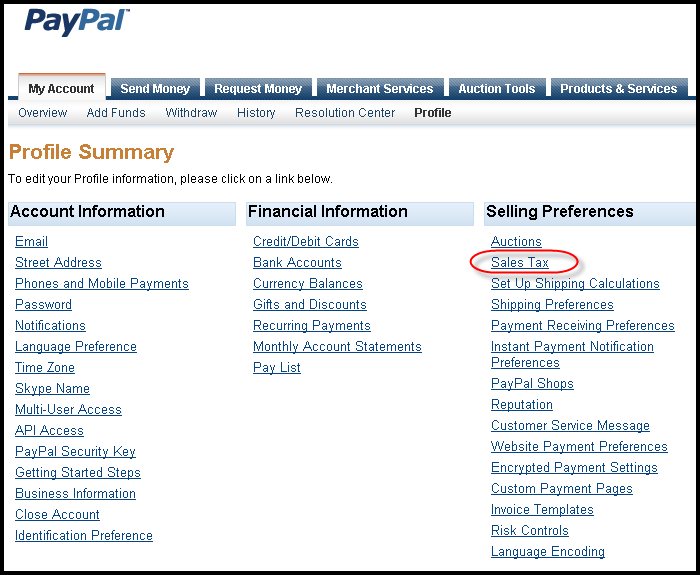
6. Click on “Profile”

PayPal -> Profile Navigation Menu Screen Shot

7. Click on “Sales Tax”

PayPal Sales Tax Screen Shot

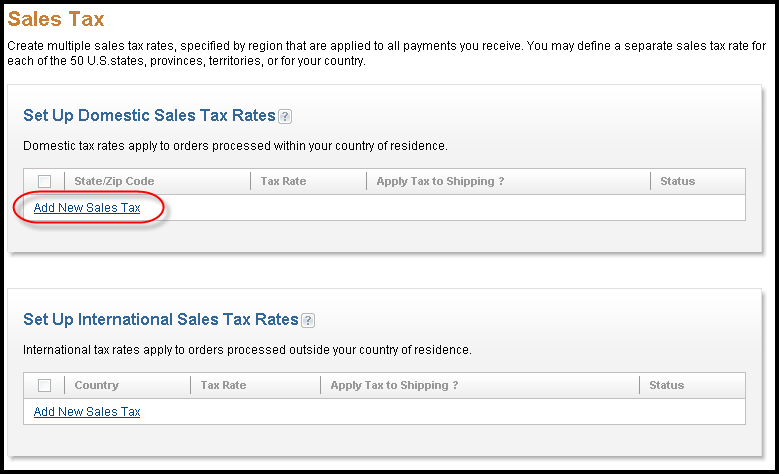
8. Click on “Add New Sales Tax”

PayPal Sales Tax Screen Shot

9. Follow the PayPal instructions, repeat to setup more than one location

Please Note: If you are using Google Checkout and/or PayPal Express, your PayPal Tax settings will not be applied when a customer makes a purchase via PayPal Express.  We highly reccommend deleting all Google Checkout and PayPal Express information on your store settings page.  Your customers will still be able to pay with PayPal or any major credit card.

How do I use PayPal Shipping Settings?

Monday, September 22nd, 2008

If you need advanced shipping options, using your PayPal shipping settings is the way to go.  Here are step by step instructions on using your PayPal Shipping Settings.

1. Login to your store Head Quarters

2. Navigate to “Store” -> “Settings”

flyingcart-store-settings

3. Scroll down the page  to the “PayPal Checkout” section and select “Use my PayPal shipping settings”

PayPal Override Shipping Settings

4. Click “Update Settings” at the bottom of the page.

5. Login to your PayPal account

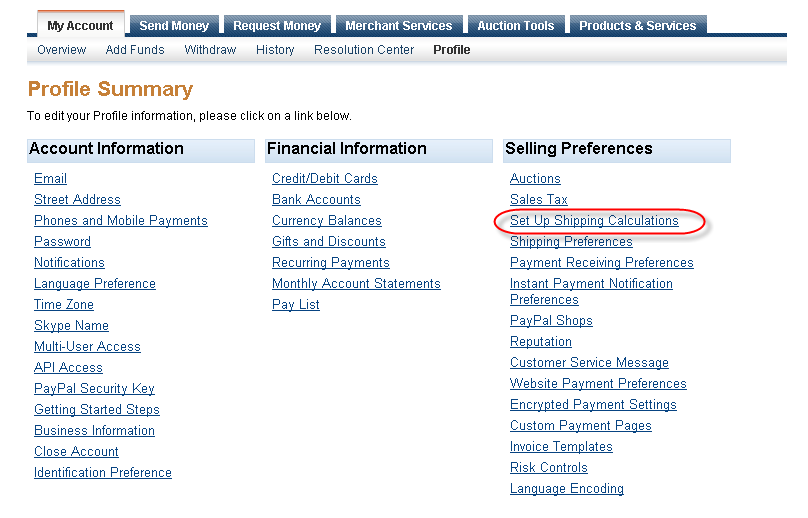
6. Click on “Profile”

7. Click “Setup Shipping Calculations”

8. Follow the PayPal setup instructions to setup your shipping settings

Please Note: If you are using Google Checkout and/or PayPal Express your PayPal Shipping settings will not be applied when a customer makes a purchase via Google Checkout or PayPal Express.  We highly reccommend deleting all Google Checkout and PayPal Express information on your store settings page.  Your customers will still be able to pay with PayPal or any major credit card.

How to delete fan postings

Monday, September 15th, 2008

Occasionally someone might post something negative on you fan club that you don’t want your customers to see. When you are logged in to your own fan club, you have the authority to delete fan postings by clicking on the red x’s that appear next to each one.

If you have a Flying Cart store account, you automatically have a Flying Cart fan account. Your store login and password can be used to log in to any Flying Cart store fan club including your own.

How do I Remove a Featured Item from my Homepage?

Tuesday, August 5th, 2008

To unfeature an item follow these steps:

1. Login to your store headquarters

2. Click on the Products tab

store-products1

3. Click on the product you wish to remove from the homepage

4. Scroll down the to varaiations section on the edit product page

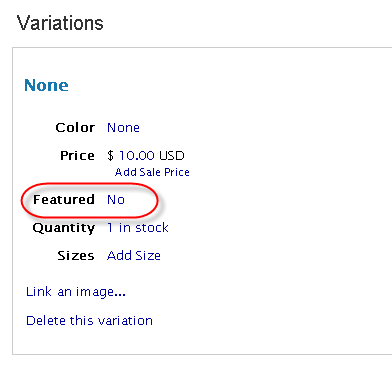
5. Click on the “Yes” or “No” next to “Featured”.  If it is marked as “Yes” the item will be featured on your homepage.

How Do I Change Passwords?

Saturday, July 5th, 2008

Wanna change passwords?  Great idea!

1. Login to your headquarters

2. Click on the “Store” tab in the menu

flyingcart-store-settings

3. Type in your new password twice

password

4. Make sure you save it by scrolling to the bottom and hitting “Update Settings”

5. Remember your new password (FYI: ex girlfriend names do not make good passwords because you keep remembering them)

Does Google know your Store exists?

Monday, June 23rd, 2008

This is the easiest way to make sure Google knows your store exists:

1. Go to Google Webmasters Tool website

2. Click on “Sign Up Now” and sign in with your Google account. Your Gmail email address will work. If you don’t have a Google account, sign up for one. It’s free.

3. Click on “Add Site”

4. Enter in your Flying Cart store URL (ex: www.MYCoolStore.FlyingCart.com) and click “Continue”

5. Select “Meta tag” from the Verification method drop down

6. Copy the entire line of code they give you INCLUDING the brackets “<” and “>” and click on “Verify” towards the bottom.

7. Login to your store Headquarters

8. Click on the “Marketing”-> ” Basic” tab

9. Scroll down to the “Google Verification Code” Section and paste in the entire line of code you obtained in step #6

Flying Cart Screen Shot of Where to Add the Google Verification Meta Tag Code

11. Click “Update Settings” in your store headquarters

12. Click “Verify” in your Google Tools account

Get more tips like this in your email by subscribing to our blog.

Add a Link to your Blog!

Monday, June 23rd, 2008

We just added a feature for all you bloggers out there (something we highly recommend to do).  Easily add your blog to your store navigation menu.

Here is how you can do it:

1. Login to your store Headquarters

2. Click on the “Store” tab

3. Click on the “Homepage sub tab

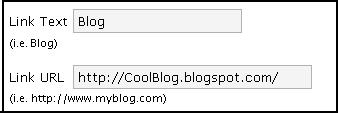
Add a Link to your Blog

4. Enter in the link text (i.e. Blog, MySpace Page, Main Site, More Info, etc.)

5. And your link.  Make sure you include the “http://:” in the URL

Here are some sites you can use for this new feature

Blogging Sites:

1. WordPress (What we use)

2. Google’s Blogger

Social Network sites:

1. MySpace

2. Create a Facebook Page for your store

3. Ning

Charge a little extra for a specific size/color

Saturday, May 31st, 2008

Sometimes a size XXXL or a glittered pattern costs a little extra.  Here is our step by step guide on doing so.

STEP 1: First decide what you are going to charge a little extra for.  In this case lets say you want to charge extra for an XXXL size.

STEP 2: Make “Size” your primary product attribute (the default is color).  You can do this on the Products -> Attributes tab.

STEP 3: Browse and click Edit one of your existing products.

STEP 4: Click on “Add New Size” at the bottom of this page (if your primary attribute is color the link will be “Add New Color).

STEP 5: Select the “XXXL” size in the drop down

STEP 6: Select the special pricing

You are all set! Now your customers can easily pay extra.

Inventory Tracking is here!

Wednesday, May 21st, 2008

Track your inventory. Sit back and relax, you can now stop worrying about over selling.

Enter in your product quantities and choose whether you want them to display in your store after they are sold out. Get email notifications when things sell out. Ease your mind knowing you won’t oversell. This feature is only available to Pro customers.

How It Works
Step 1: When adding (or editing) a product, select “Track Product Quantities”

Step 2: Select “Continue selling after stock reaches 0″ (good if you know you can get more easily) OR “Mark the product SOLD OUT when stock reaches 0 and stop selling” (good if you have a limited supply)

Step 3: Enter in the amount you have in the Quantity box. When you are on the edit page, you can enter a different quantity for each color or size of the item.

When customers purchase items in your store, the quantities in stock will be updated on the products that you are tracking.

If you have chosen the option to stop selling a product when it becomes sold out, it will no longer be displayed in your store. If you have a product with multiple colors and sizes and only some of them are sold out, customers will not be able to add the sold out ones to their cart. After products are sold out you are still able to view and edit them in your Headquarters.

Email notifications

You have the option of receiving an email when your products sell out. This is turned on by default and can be turned off on the Store > Settings page in your Headquarters.

Note to Pro customers

If you opened a store with us before May 12, 2008, have more than 50 products, and would like to track quantities on ALL of your products, please send us an email. We can turn it on at once for all your products and set a default quantity, which will save you the work of doing it manually.